
My first program in MakeCode
How we give the micro:bit instructions
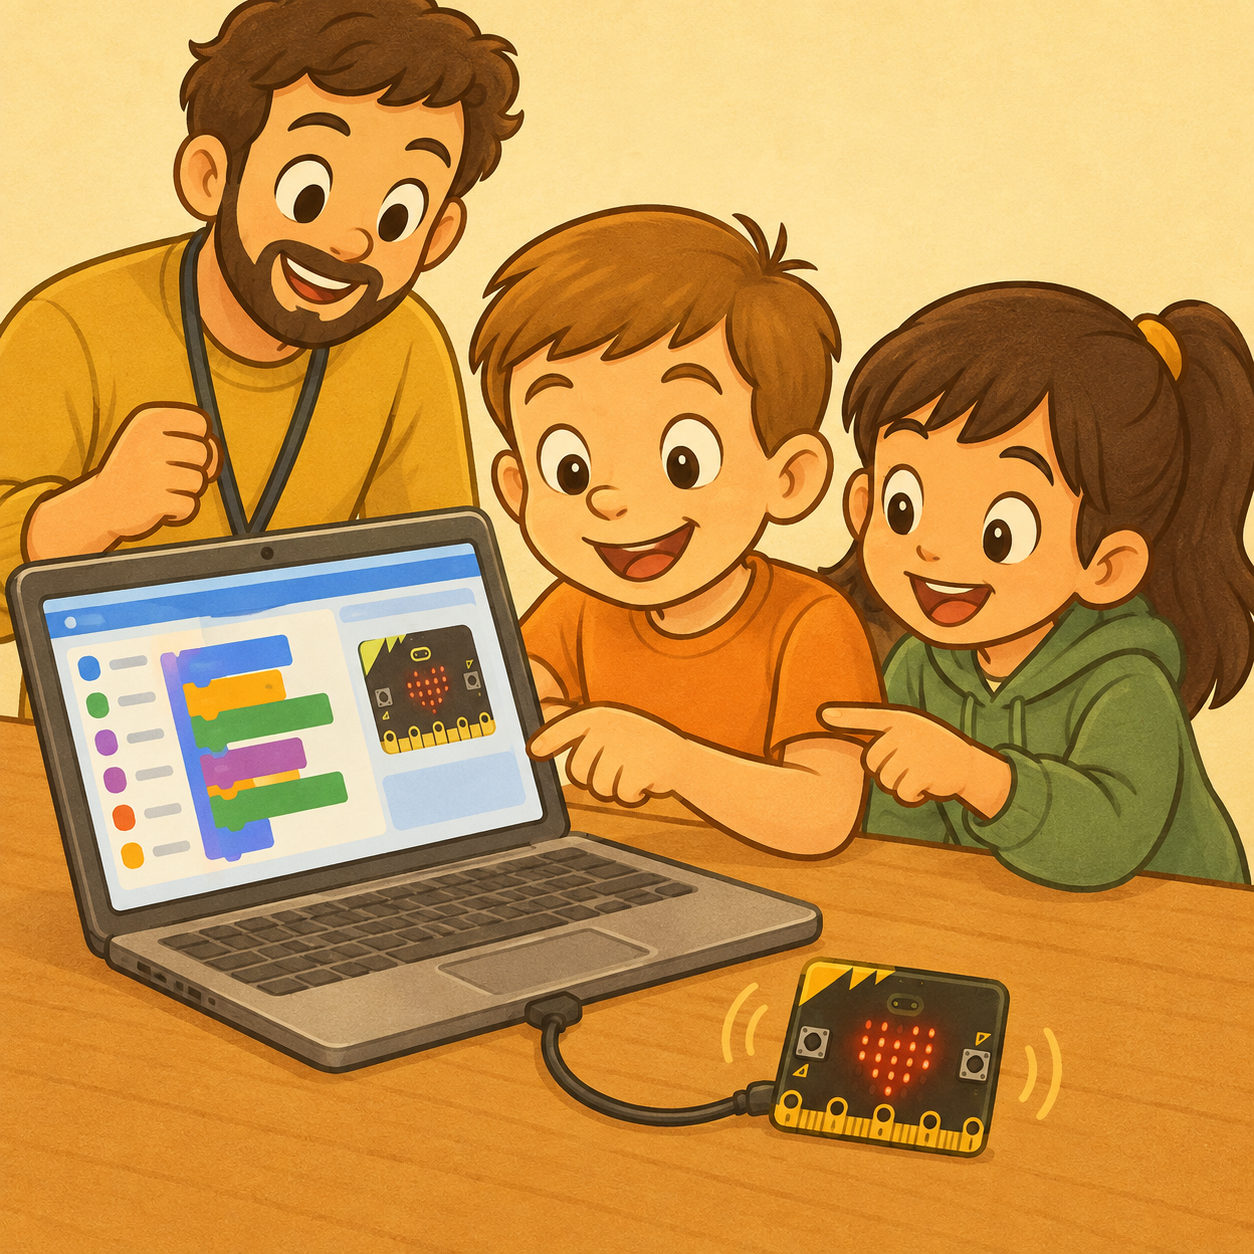
So far we have explored electricity, LEDs, resistors, the breadboard and small electronic circuits. Now we are going to meet the micro:bit – a small computer that we can program.
On its own, the micro:bit doesn’t know what we want it to do. We need to give it clear instructions.
These instructions are called a program or code.
Today we will use Microsoft MakeCode. It is a program where we don’t have to start by typing difficult commands in letters. Instead, we use coloured blocks that we drag, arrange and join together like a puzzle.
MakeCode is the official editor for getting started with the BBC micro:bit, and it is made especially for learning to program with blocks.
Our mission
Today we will learn to:
- Open a new project in MakeCode.
- Give the project a name.
- Find the main block categories.
- Drag blocks into the programming area.
- Run the program in the simulator.
- Copy the program onto a real micro:bit.
- Use on start, forever, buttons A and B, and the LED screen.
- Make a few short programs.
At the end of the workshop you will be able to say:
I wrote a program that tells the micro:bit what to do.
What is MakeCode?
MakeCode is a tool where we create programs for the micro:bit.
We open it in a web browser on a computer or tablet: makecode.microbit.org.
There is always a link to MakeCode in the menu on the right.
When we open a new project, we usually see a few important parts of the screen:
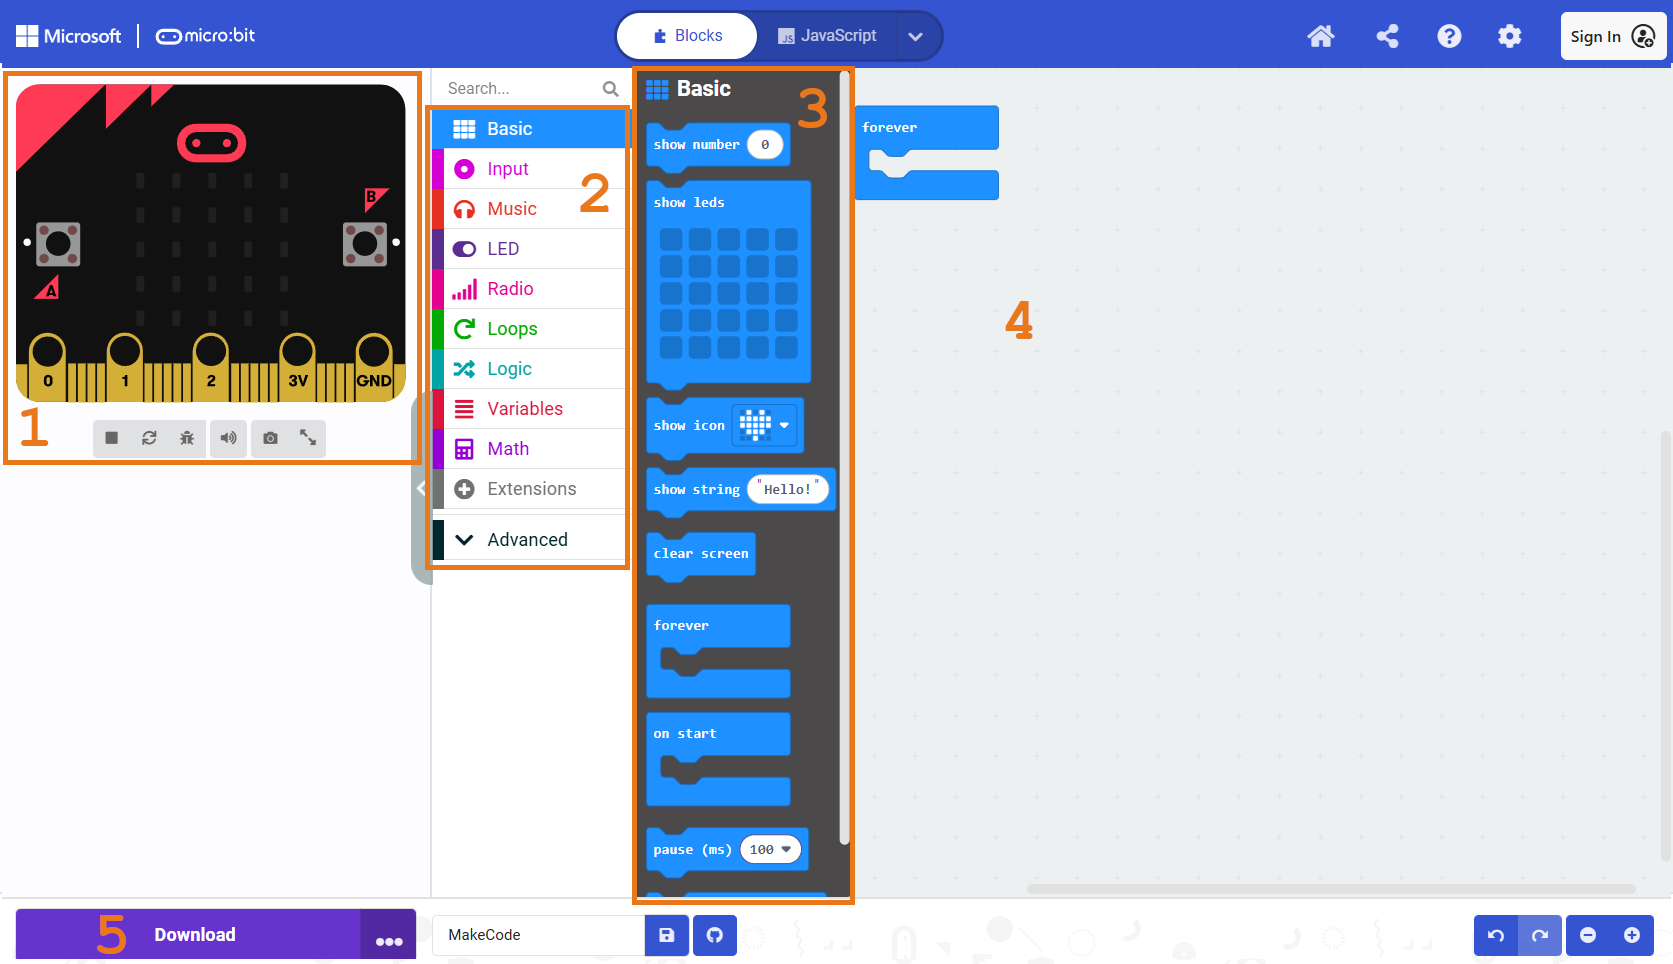
- Simulator: Shows a little micro:bit on the screen and runs our program
- Block categories: This is where we choose the kind of commands, for example Basic, Input and Loops
- Blocks: The commands we drag into the program
- Workspace: The big area where we put our program together
- Download: Downloads the program for the real micro:bit
Before we copy the program onto a real micro:bit, we can try it out in the simulator (1).
Simulator
The simulator is a digital version of the micro:bit on the screen. It helps us test an idea before we connect the real device.MakeCode blocks join together to make a program, and the simulator lets us test the program right there in the editor.
Safety rules for the computer and the micro:bit
Before we start, let’s remember the important workshop rules:
- We only use the computer when the workshop leader says it’s time to work on the computer.
- We don’t open games, YouTube, social media or other websites that aren’t part of the workshop.
- Playing games on the computer during the workshop is not allowed.
- When the leader is explaining, we don’t click and we don’t change the program.
- We hold the micro:bit by its edges.
- We don’t pull the micro:bit by its USB cable.
- We don’t connect wires, LEDs or batteries to the micro:bit unless the leader tells us to.
- If we finish a task early, we ask the leader for an extra challenge.
The computer is our tool for creating, programming and testing — it is not a toy during the workshop.
Important!
The computer is our tool for creating, programming and testing – it is not a toy during the workshop.How to make a new project
Step 1: Open MakeCode
Open a web browser and go to makecode.microbit.org.
Then click: New Project
Step 2: Give your project a name
Type a name that describes your program.
For example: My first program
Click: Create
Step 3: Look at the starting blocks
In a new project, MakeCode usually shows two big blocks: on start and forever.
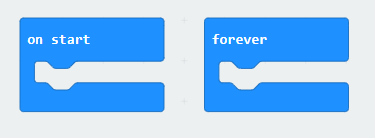
On start and forever
On start: do it once
The on start block is for commands that the micro:bit should do only once, when it is switched on or when the program starts.
Examples:
- Show my name.
- Show the number 7.
- Say hello to the user.
- Set the starting score to 0.
Forever: repeat all the time
The forever block is for commands that the micro:bit should repeat all the time.
Examples:
- Show a beating heart.
- Keep checking whether a button is pressed.
- Keep checking whether it is dark.
- Keep watching the temperature.
Rule to remember
On start runs once.Forever runs all the time.
In MakeCode, on start runs at the beginning of the program, and forever repeats its commands non-stop while the micro:bit is running.
How do blocks fit together?
Blocks have different shapes.
Some blocks can sit one under another, like commands in a list:
- Show text
- Show an icon
- Wait
- Show some more text
Some blocks are special starting blocks, like on start, forever or on button A pressed.
In MakeCode we drag a block with the mouse or a finger, move it into the workspace and drop it where it can join on.
If the block is in the right place, MakeCode will show that it can join on.
Remember
A program is like a recipe: the commands must be in the right order.Block categories
The block categories are on the left side of MakeCode.
To start with, we will mostly use these:
- Basic: Text, numbers, icons, LED pictures, pause
- Input: Buttons A and B, shaking, tilting, sound and other inputs
- Music: Sounds and tunes
- LED: Drawing your own pictures on the LED screen
- Radio: Communication between micro:bits
- Loops: Repeating commands
- Logic: if and else rules
- Variables: Counters, scores and values that change
- Math: Maths operations
- Advanced: Advanced block categories, which we will use in some workshops and explain when we need them.
At the start we don’t have to use all the categories. It is enough to learn a few blocks and make something that works.
Practice programs
Program 1: Hello, micro:bit!
What should the program do?
When the program starts:
- Show my name.
- Show a heart.
Plan before you program
Before we start putting MakeCode blocks together, it helps to first explain what we want the micro:bit to do. We can do this with pseudocode or a flowchart.
Pseudocode is a program written in ordinary, simple words. It looks a bit like a program, but the computer can't run it. We write it so that people can easily understand the order of the steps.
A flowchart is a drawing of a program. We draw the steps in boxes, and arrows show the order in which the micro:bit moves from one step to the next.
Pseudocode and flowcharts help us think of a solution first, and then turn it into MakeCode blocks more easily. Pseudocode describes the actions and their order in words, while a flowchart shows the steps and how they follow each other with boxes and arrows.
Example 1: Hello, micro:bit!In this exercise we want the micro:bit to show our name at the start, and then a heart.
Pseudocode:
WHEN THE PROGRAM STARTS
SHOW MY NAME
SHOW A HEART
END
Flowchart:
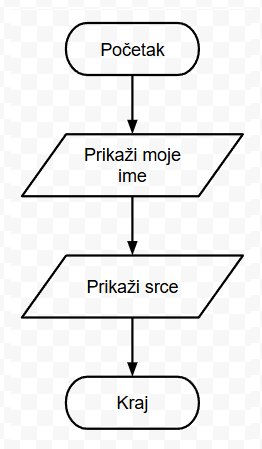
In MakeCode we turn this plan into an on start block, and inside it we add show string and show icon. The on start block runs its commands when the program starts.
How do you choose the right way to plan?
- Use pseudocode when you want to quickly write down what the program should do.
- Use a flowchart when you want to draw the order of the steps and see more easily what happens after which event.
For a simple program you can use just pseudocode.
For a program with several buttons, sensors, decisions or repeats, it helps to make a flowchart too.
The most important thing is to know the answers to these questions first:
- What starts the program?
- What should the micro:bit do?
- In what order should it do it?
- Should the program repeat something or wait for an event?
Blocks we need
From the Basic category:
- show string
- show icon
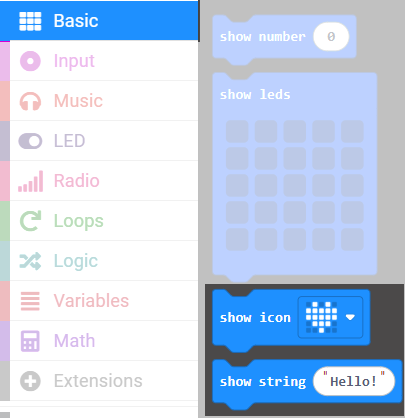
How to put the program together
Inside the on start block, put:
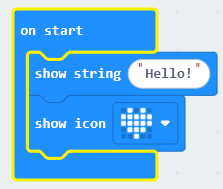
Test it in the simulator
Look at the micro:bit on the left side of the screen.
It should show your name scrolling across the LED screen, and then a heart icon.
Challenges:
- Change the heart to a smiley face.
- Show your favourite number after your name.
- Write a short message, for example: HI!.
Remember
The show icon block shows the chosen icon on the micro:bit's LED screen, and show string shows text that scrolls across the screen.Program 2: A beating heart
Now we will make a program that repeats all the time.
What should the program do?
- Show a big heart.
- Wait.
- Show a small heart.
- Wait.
- Repeat all the time.
Blocks we need
From the Basic category:
- show icon
- pause (ms)

We will use the forever block.
How to put the program together
Inside the forever block, put:
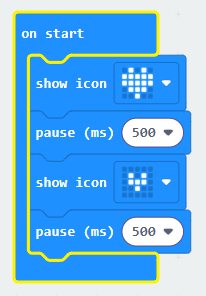
The number 500 means half a second.
- 1000 ms = 1 second
- 500 ms = half a second
Test it
In the simulator, the heart should look as if it is beating.
Challenges:
- Change the pause to 200 ms. Is the heart faster?
- Change the pause to 1000 ms. Is the heart slower?
- Instead of a heart, make a blinking smiley face.
- Make an animation from two or three LED pictures of your own.
Program 3: Button A and button B
The micro:bit has two big buttons on the front: A and B
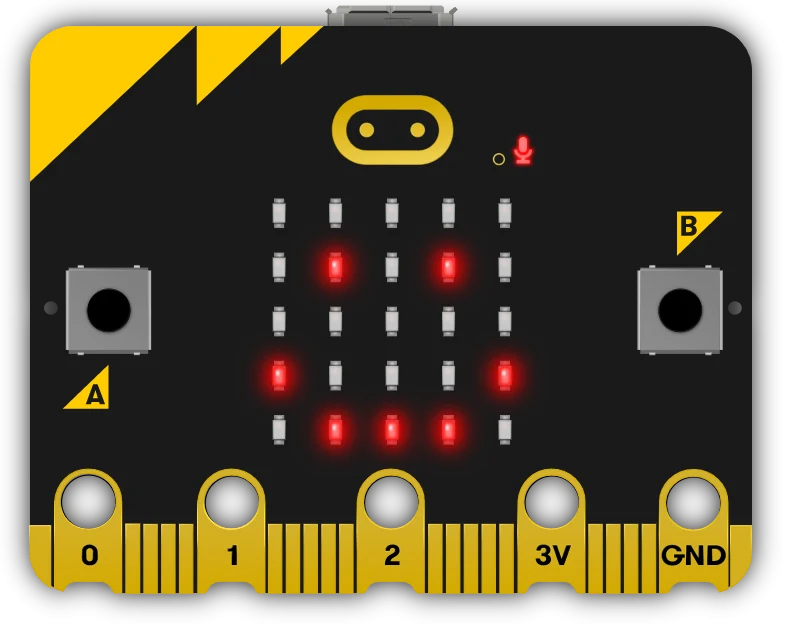
We can give it a rule:
- If I press A ⇒ show one thing.
- If I press B ⇒ show another thing.
What should the program do?
When I press A:
- show the letter A
When I press B:
- show the letter B
Plan before you program
Pseudocode:
WHEN BUTTON A IS PRESSED
SHOW THE LETTER "A"
WHEN BUTTON B IS PRESSED
SHOW THE LETTER "B"
Flowchart:
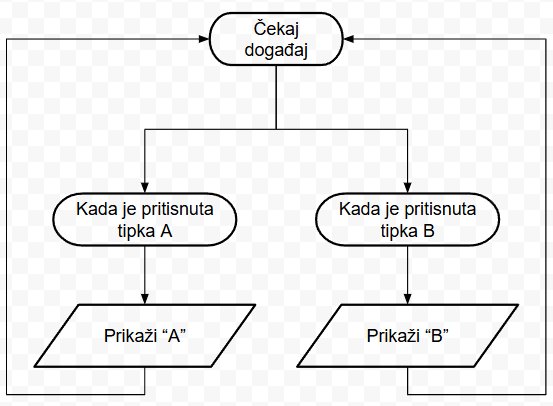
Simplified flowchart:
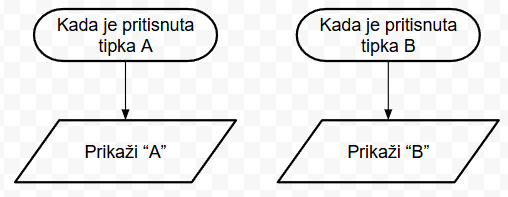
Here the micro:bit doesn't do everything straight away at the start. It waits for an event to happen: a press of button A or B. The MakeCode block on button pressed runs its commands when the chosen button is pressed.
Blocks we need
From the Input category:
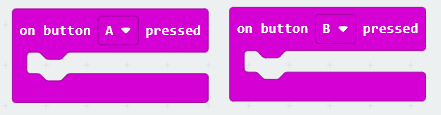
- on button A pressed
- on button B pressed
From the Basic category:
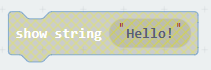
- show string
How to put the program together
Inside the first event, put:
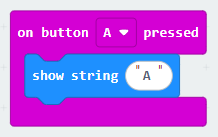
Inside the second event, put:
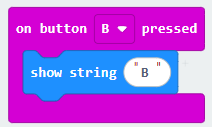
Test it
In the simulator, click button A.
The text A should appear.
Then click button B.
The text B should appear.
Challenges:
Change the program so that:
- Button A shows your name
- Button B shows your favourite number
- Buttons A+B show a heart
Remember
Buttons A and B can be used as inputs, and MakeCode has event blocks that run commands when the chosen button is pressed.Program 4: A digital dice
Now we will make a small electronic dice.
When we shake the micro:bit, it will show a random number from 1 to 6.
Plan before you program
Pseudocode:
WHEN THE MICRO:BIT DETECTS A SHAKE
PICK A RANDOM NUMBER FROM 1 TO 6
SHOW THE NUMBER THAT WAS PICKED
Flowchart:
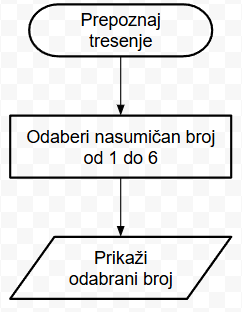
The micro:bit has a sensor that can detect shaking. The on shake block runs its commands when the micro:bit notices this movement.
What should the program do?
When we shake the micro:bit:
- pick a random number from 1 to 6
- show that number
Blocks we need
From the Input category:
- on shakeFrom the Math category:
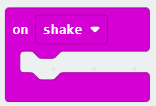
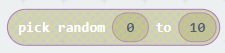
- pick random 0 to 10From the Basic category:
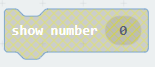
- show number
How to put the program together
Inside the on shake block, put:
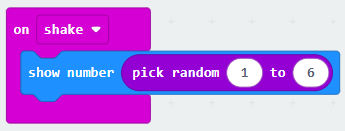
Test it
In the simulator, find the option to shake the micro:bit, or use a real micro:bit.
Every time you shake it, it should show a number between 1 and 6.
Important safety rules:
- Shake the micro:bit gently.
- Don't throw the micro:bit.
- Don't bang it on the table.
- Don't wave it around near other people.
- If the micro:bit is connected with a USB cable, don't shake it hard.
Challenges:
- Make a dice that gives a number from 1 to 10.
- Make a yes/no decision: YES or NO.
- Make a magic ball that shows MAYBE, YES or NO.
- Add a smiley face icon after the number 6.
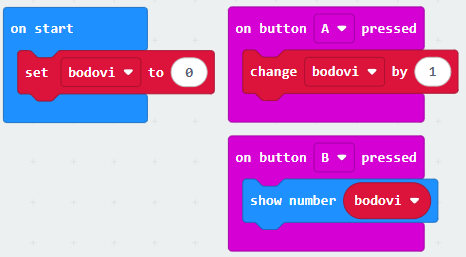
Program 5: A score counter
Now we will make a small counter.
For this we need a variable.
A variable is like a little box with a name, where the micro:bit can keep a number or some other kind of data.
For example:
- score = 0
When we press button A, we can add one point:
- score = score + 1
When we press button B, we can show how many points we have.
What should the program do?
At the start:
- score = 0
When I press A:
- add 1 point
When I press B:
- show the score
Blocks we need
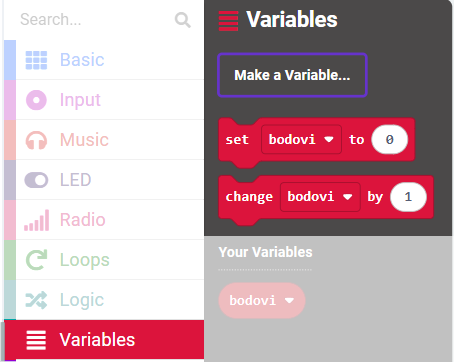
From the Variables category:
- Make a Variable
- set score to 0
- change score by 1From the Input category:
- on button A pressed
- on button B pressedFrom the Basic category:
- show number
How to put the program together
First make a variable: score
Then put together:
Test it
Press button A a few times.
Press button B.
The micro:bit should show the total number of presses.
Challenges:
- Make button A add 1 point.
- Make button B take away 1 point.
- Make buttons A+B show the current score.
- Add a rule: if the score reaches 10, show a big heart.
The simulator and the real micro:bit
Before you copy a program onto a real micro:bit, always look at it in the simulator first.
The simulator can show:
- Whether the text will appear.
- Whether the icon will blink.
- What happens when we press A or B.
- How the counter works.
- How the program behaves when we shake it.
But the simulator is not exactly the same as the real device.
On a real micro:bit we can:
- Press real buttons.
- Shake the device.
- See the real LEDs.
- Later on, connect a breadboard, sensors, external LEDs and other components.
The simulator is great for a first check. The real micro:bit is where we test our real invention.
How to copy a program onto the micro:bit
When the program works in the simulator, we can copy it onto a real micro:bit.
Step 1: Connect the micro:bit
- Connect the micro:bit to the computer with a USB cable.
- Hold the micro:bit by its edges and don’t pull the cable.
Step 2: Click Download
- In MakeCode, click Download
Depending on the computer and the browser, MakeCode may:
- offer to connect to the micro:bit,
- download the program file,
- help us send the file to the micro:bit.
Step 3: Wait for the transfer
- While the micro:bit is receiving the program, the small yellow light on its back may blink.
- We don’t unplug the USB cable while the transfer is going on.
Step 4: Test it
- When the transfer has finished, the micro:bit starts running the new program straight away.
- If the program doesn’t work the way we expect:
- We go back to MakeCode.
- We check the blocks.
- We fix the mistake.
- We download the program again.
- We test it again.
The usual steps are: make the project, test it in the simulator, click Download, connect the micro:bit with a USB cable and copy the program onto the device.
If the program doesn’t work
Programming is exploring. It is completely normal for the first try not to work perfectly.
When a program doesn’t work, finding and fixing the problem is called debugging.
Program checklist
- Is the block in the right part of the program?
- Should the block be inside on start, forever or a button event?
- Did you choose the right button, A or B?
- Did you type the right text or number?
- Is the block really joined to the other blocks?
- Does the program work in the simulator?
- Did you click Download after changing the program?
- Is the micro:bit connected with a USB cable?
- Did you wait for the transfer to finish?
- Can a friend or the leader look at the program with fresh eyes?
- A mistake is not the end of the project. A mistake is a clue that shows us what we need to check.
 What did we learn?
- A program is a set of instructions that we give to the micro:bit.
- MakeCode uses coloured blocks to get started with programming.
- The simulator shows us how the program will work.
- on start runs commands once.
- forever repeats commands all the time.
- Buttons A and B can start different parts of the program.
- The micro:bit can show text, a number, an icon or your own LED picture.
- The micro:bit can react to shaking.
- A variable can keep a number, for example the score.
- We test a program first, then copy it onto a real micro:bit.
- Debugging means finding and fixing a mistake in a program.
Questions to finish
1. What is a program?
2. What do we use MakeCode for?
3. What is the simulator?
4. What is the difference between the on start and forever blocks?
5. Which block category has the commands for showing an icon or text?
6. How can the micro:bit find out that we have pressed button A?
7. What happens when we use the forever block in a program?
8. What is a variable?
score can keep the number of points and change when we press a button.9. What do you need to do before we copy the program onto a real micro:bit?
Download and wait for the program transfer to finish.