
Electric circuit
Turn on the light!
How can electricity from a battery light up an LED?
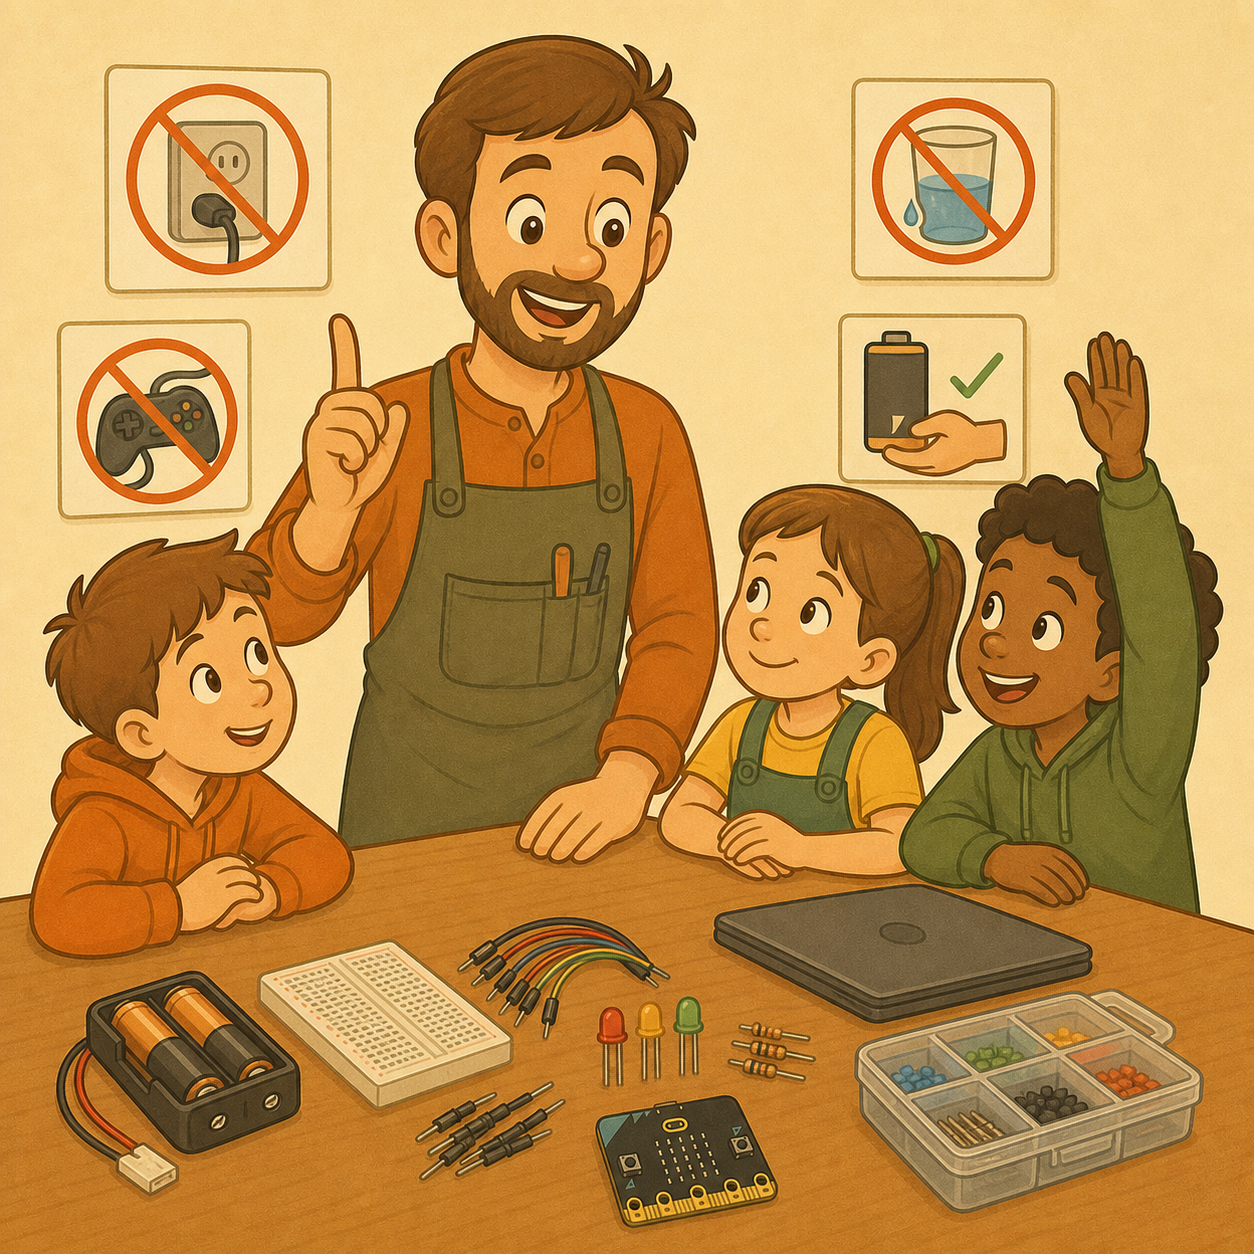
Today we won’t just talk about electricity we’ll use it straight away to make something real: a little light that shines.
We will need a battery, a few wires and an LED. By the end of the workshop you will be able to explain why the LED sometimes lights up, why sometimes it doesn’t, and how to find the problem in your circuit.
Today we are electricity explorers
All around us there are devices that run on electrical energy:
- the lights at home and at school,
- the TV and the computer,
- phones and tablets,
- traffic lights in the street,
- the fridge,
- a robot, a toy car
- or a micro:bit.
But electrical energy doesn’t always come from the same place.
Some devices get their energy from a wall socket. Others use batteries. Today we will use small batteries, because they are just right for our little electronics experiments.
Important!
In the workshop we only use batteries and low-voltage electronic parts. We don't touch wall sockets, chargers, bare cables or electrical devices that run on electricity from the wall.What is electric current?
Electric current is electric charge moving through a material that lets it move, for example through a metal wire.
You can imagine it like water flowing through a pipe:
- the battery is like a small pump,
- the wires are like pipes,
- the electric current travels through the wires,
- the LED uses the electrical energy and turns it into light.
This comparison isn’t exactly the same as real electricity, but it helps us understand the main idea: for something to work, the energy needs a path it can travel along.
What is a circuit?
A circuit is a closed path that electrical energy can travel along: from the battery, through the part we want to make work, and then back to the battery.
For our first electronic circuit we need:
- A battery – Gives energy to the circuit.
- Wires – Connect the parts and make a path for the current.
- An LED – Lights up when the right amount of current flows through it.
- A resistor – Helps protect the LED from too much current.
- A switch or a push button – Can open or close the circuit.
Today we will first build the simplest circuit, with a battery, wires, a resistor and an LED.
Closed or open circuit?
Imagine a round cycle track. If the track is joined up all the way round, a cyclist can ride round and round. If there is a hole or a gap somewhere, the cyclist can’t get past.
A circuit works in a similar way:
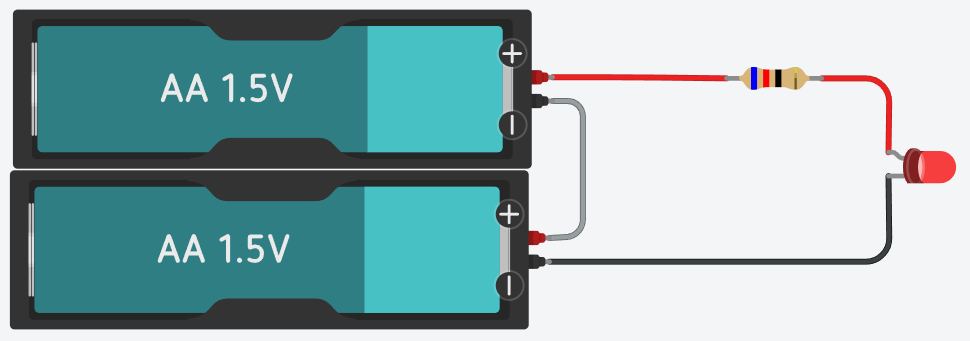
- A closed circuit has a complete path from the battery, through the LED and back to the battery. The LED can light up.
- An open circuit has a gap. Maybe a wire has come loose, the switch isn’t pressed or a component is in the wrong place. Then the LED doesn’t light up.
Look at these two simple examples:
CLOSED CIRCUIT
OPEN CIRCUIT
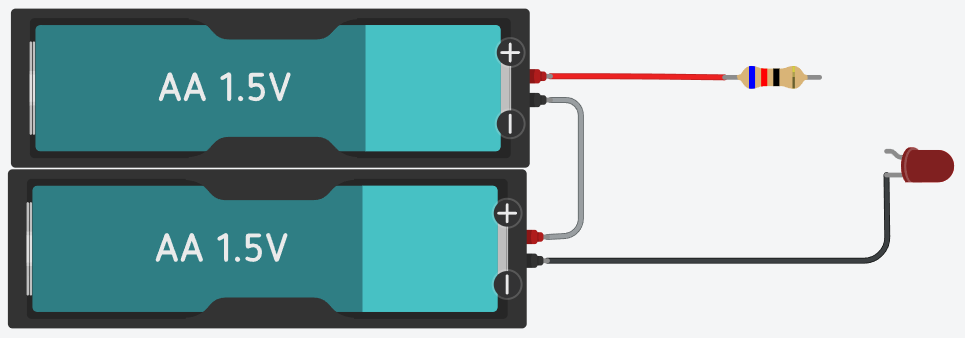
In the first example there is an unbroken path. In the second there is a gap.
Meet the LED
An LED is a small electronic light. The letters LED stand for the English words Light Emitting Diode, which means a part that gives off light when it is connected to a circuit the right way.
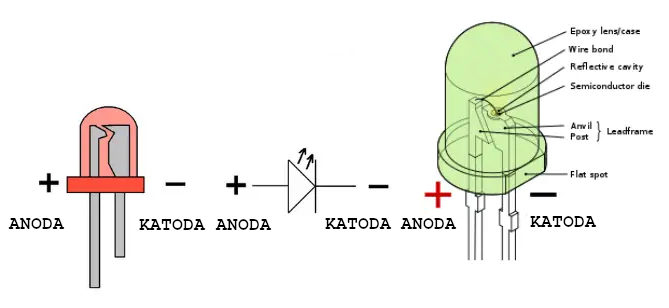
An LED has two legs, but they are not the same:
- The longer leg usually connects towards the plus of the battery.
- The shorter leg usually connects towards the minus of the battery.
- The flat side on the rim of the LED shows the minus side.
An LED has a direction. If you put it in the wrong way round, it usually won’t light up. That doesn’t mean it is broken — maybe you just need to turn it round.
Rule to remember
The long leg of the LED goes towards the plus of the battery, and the short leg towards the minus.Why do we use a resistor?
A resistor is a small part that helps stop too much current from flowing through the LED.
You can imagine it as a narrow part of a water pipe. If too much electrical energy went through the LED, the LED could get very hot or stop working.
The resistor protects the LED and helps it light up safely.
A resistor doesn’t have a plus and a minus. You can turn it either way round.
Rule to remember
We almost always use a resistor together with an LED.Our mission: make a light
Your task is to build a simple circuit like the one in the picture:
When the LED lights up, you have managed to make a closed circuit.
Steps
- Look at the LED and find its longer and shorter legs.
- Find the plus and minus on the battery holder.
- Connect the plus of the battery to one end of the resistor.
- Connect the other end of the resistor to the longer leg of the LED.
- Connect the shorter leg of the LED to the minus of the battery.
- Switch on the battery holder, if it has a switch.
- Watch: does the LED light up?
If it lights up great! You have just built an electronic circuit.
If it doesn’t light up that is also part of exploring. Electronics engineers don’t give up straight away; they look for where the problem is.
If the LED doesn’t light up
First of all, don’t swap all the parts at random. Work like a real electronics engineer: check one thing at a time.
- Check that the batteries are in the holder the right way round.
- Check that the switch on the battery holder is on (if it has one).
- Check that the LED is the right way round: longer leg towards plus, shorter leg towards minus.
- Check that all the connections are really touching.
- Check that there is a complete path from the plus of the battery to the minus of the battery.
- If it still doesn’t work, call the leader or a friend so you can look at the circuit together.
Remember
A first try that doesn't work is not a failure. It is a clue that tells us what we need to check.Lab safety rules
Today we are working with low-voltage batteries, but electronics still has rules.
- We never connect the plus and minus of a battery directly with just a wire.
- We don’t put batteries, wires or parts in our mouth.
- We don’t work with wet hands and we don’t keep drinks next to the electronics.
- If a battery, a wire or a part gets hot, stop working straight away and call the leader.
- We don’t take batteries apart and we don’t try to charge them, unless the leader says they are rechargeable and shows us how to do it.
- When we finish, we switch off the switch or disconnect the battery.
Extra challenges
If your LED has already lit up, try one of these challenges:
- Turn the LED the other way round. What happens?
- Disconnect one wire. Can the LED still light up?
- Try an LED of a different colour.
- Draw your circuit: the battery, the resistor, the LED and the wires.
- Add a switch or a push button so that the LED only lights up when you press it. Can you draw a circuit like that?
- Explain to a friend how to find the mistake if the LED doesn’t light up.
 What did we learn?
- Today we saw that an electronic device needs a few important parts and rules:
- the battery gives energy,
- the wires connect the parts,
- the LED turns electrical energy into light,
- the resistor helps protect the LED,
- the circuit must be closed for the LED to light up,
- the LED has a direction and must be put in the right way round,
- we always use electronics carefully and safely.
In the next workshops we will find out which things conduct electricity, how switches work and how we can make a device that reacts to touch, light or movement.
Later on we will meet the micro:bit. It will be like a small programmable brain for our project: it will be able to read sensors, keep track of what is happening around it and decide when to switch on a light, play a sound or start something else.
Questions to finish
A battery device could be a remote control, a toy, a clock or a torch. A device that runs from a wall socket could be a TV, a charger, a fridge or a desk lamp. For our workshop the battery device is safer, because we use a low voltage and safe electronic components. We don’t touch wall sockets or devices connected to mains electricity. We need a switch or a sensor that can tell whether the door is open. For example, we could use a microswitch, a magnetic sensor or two metal surfaces that touch or move apart when the door moves.1. What does the battery do in a circuit?
2. What does it mean when a circuit is closed?
3. Will the LED light up if one wire is disconnected? Why?
4. Which leg of the LED usually goes towards the plus of the battery: the longer or the shorter one?
5. Why do we use a resistor with an LED?
6. What should you do if a battery, a wire or another part starts to get hot?
7. Find one device around you that runs on a battery and one that runs from a wall socket. Which one is safer for our workshop, and why?
8. Imagine you want to make a light that only switches on when a door opens. Apart from the battery, wires, resistor and LED, what other part might you need?