Two traffic lights at a crossroads
Two Arduinos talk over a wire: traffic light A controls the crossroads, B listens and reports when it has stopped, and with millis() both notice a fault.
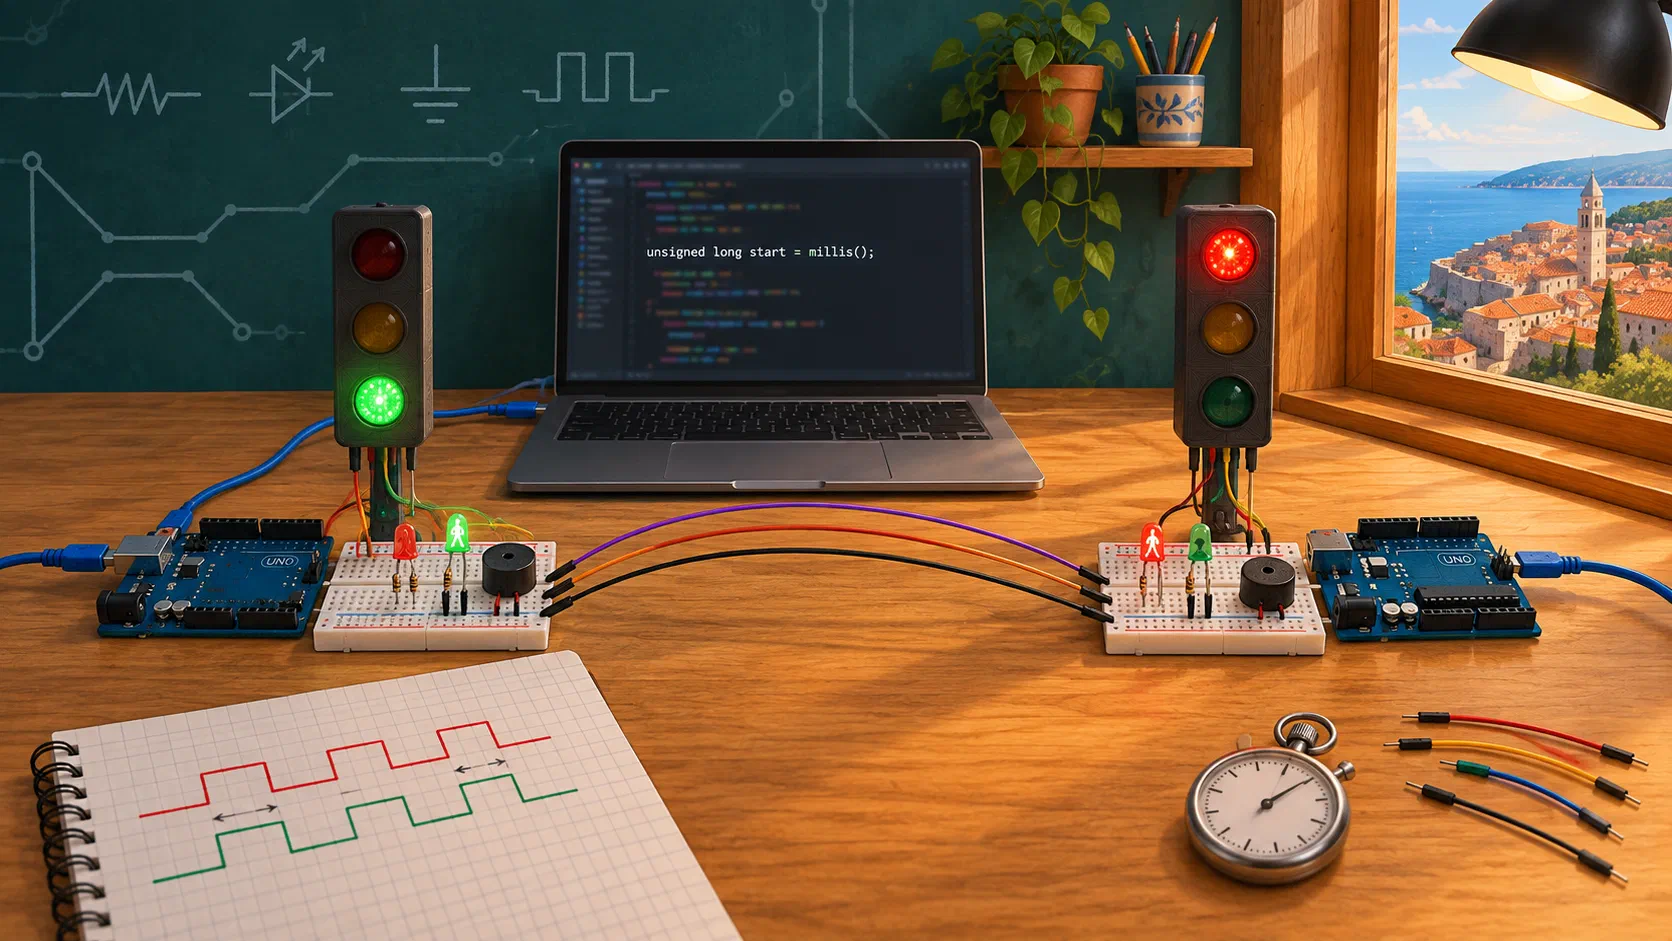
Last time each person built a traffic light for cars and pedestrians. At a real crossroads, traffic lights don’t work on their own: while one road has green, the other must have red. So the traffic lights have to agree with each other.
Today we will connect two Arduinos with a wire. Two people who sit next to each other build one crossroads together. Traffic light A controls the crossroads and tells traffic light B when it may go, and traffic light B listens to these messages.
We will also learn a new command, millis(). With it the Arduino can measure time without stopping to watch what is happening around it. That is exactly what traffic light B needs: when traffic light A breaks down, B must notice it by itself.
At the end we will add a second wire, going the other way. Through it B tells traffic light A that it has stopped, so A no longer has to guess.
Our crossroads
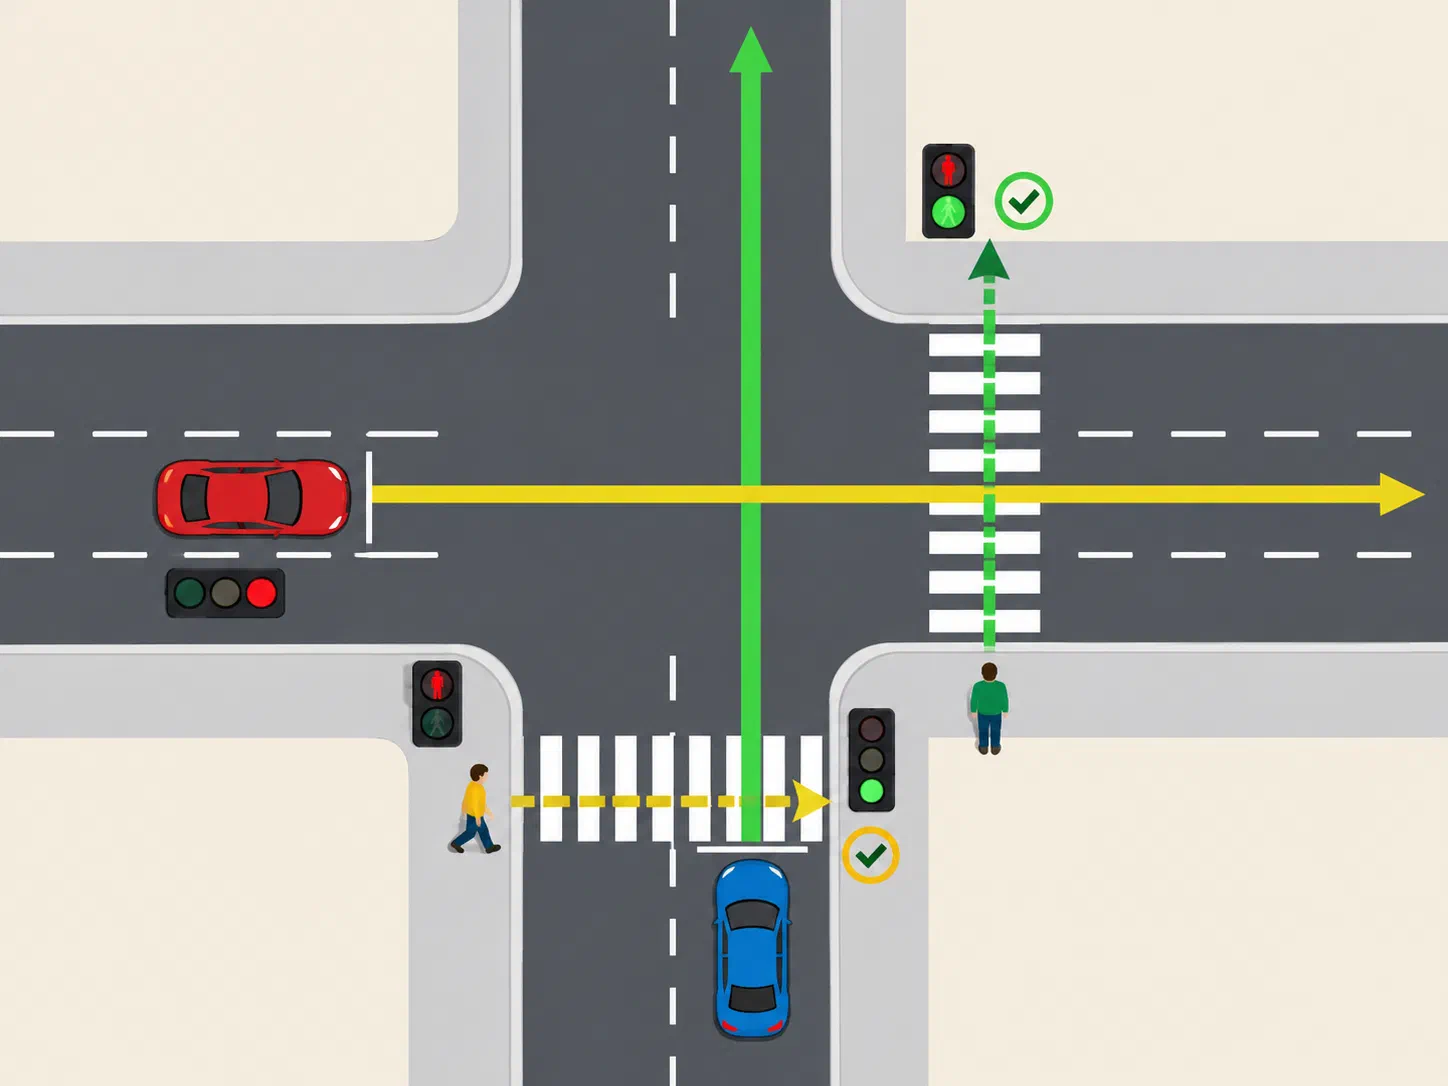
Traffic light A controls the cars and pedestrians on one road, and traffic light B those on the crossing road. As last time, the pedestrians walk alongside their cars and cross the side street. When A has green, its pedestrians cross traffic light B’s road, so B must have red at that time. And the other way round.
The most important rules of the crossroads:
- when one traffic light isn’t showing red, the other must show red;
- between them there is always at least one second when both show red. In that second, a car that entered the crossroads on yellow has time to leave it.
Why not just start both traffic lights at the same time?
We could start both traffic lights in the same second and give traffic light B a program shifted by half a cycle. It would work for a while, but not for long:
- Nobody can press two reset buttons in exactly the same millisecond.
- Each Arduino has its own clock, and two clocks never run exactly the same. The difference is tiny, but it adds up: after an hour the traffic lights could be several seconds apart.
- When one Arduino resets, for example while we upload a program to it, it starts from the beginning. The other carries on as if nothing had happened.
That is why the traffic lights must keep talking to each other.
Who is in charge?
At our crossroads traffic light A is in charge. It measures all the times, and over the wire it sends traffic light B only two messages: go and stop. B doesn’t decide by itself when to go. It only decides how to show the message with its lights.
Why can't both traffic lights be in charge?
Imagine that both traffic lights have the same rule: "When the other one has red, I may switch on green." After switching on, both have red. Both look at the other one, both see red, and both switch on green!
Programmers call a mistake like this a race condition: the result depends on who is faster. The simplest cure is to have only one in charge. That is why a real crossroads has one controller that runs all of its traffic lights.
A message through a wire
A wire can carry only two states: HIGH (about 5 V) and LOW (0 V). That is enough for our two messages:
| Wire state | Message from A | What B does |
|---|---|---|
HIGH | go | red + yellow, then green |
LOW | stop | green blinks, yellow, then red |
Why does LOW mean stop? Think about everything that can happen: someone pulls out the wire, someone pulls out traffic light A’s USB cable, or A resets while we upload a program to it. In all these cases there is no voltage on the wire, so B reads LOW and stops. Every fault on the link means stop, and never go. Engineers say that such a link is fail-safe.
How the two traffic lights work together
| Time | Traffic light A | Wire | Traffic light B |
|---|---|---|---|
| 0–4 s | red | LOW | green blinks (2 s), yellow (1 s), red |
| 4–5 s | red + yellow | LOW | red |
| 5–9 s | green, pedestrians A walk | LOW | red |
| 9–11 s | green blinks | LOW | red |
| 11–12 s | yellow | LOW | red |
| 12–13 s | red | LOW | red |
| 13–14 s | red | HIGH | red + yellow |
| 14–18 s | red | HIGH | green, pedestrians B walk |
| ⇒ | back to the start, wire LOW again |
The whole cycle lasts 18 s. Each road has the same states as last time: red + yellow 1 s, green 4 s, blinking 2 s and yellow 1 s. Between seconds 3 and 4, and between seconds 12 and 13, both traffic lights show red.
We can draw the same table as a timing diagram. Time runs from left to right, and each row shows one traffic light, one group of pedestrians or one wire. The higher the line in a traffic light’s row, the further that traffic light is in its cycle. The grey columns are the seconds when everyone is stopped.
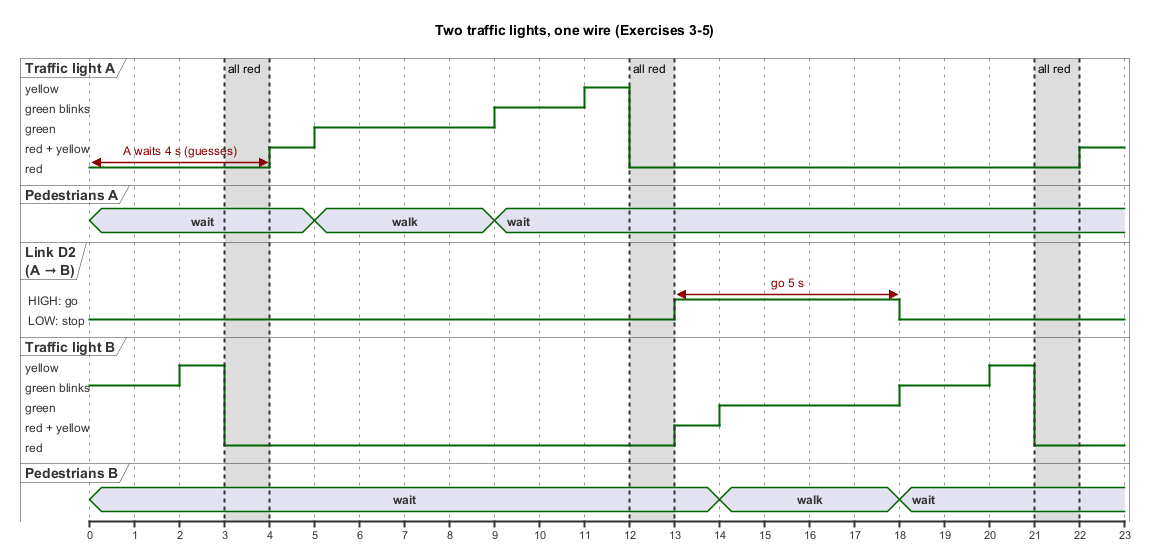
Traffic light A can’t see traffic light B’s lights. So after the stop message it waits 4 s: 2 s for the blinking, 1 s for the yellow and 1 more second when everyone has red. Only then does it switch on its red + yellow. In Exercise 6 we will fix this: B will report by itself when it has stopped.
Materials
Each person gets:
- everything from the last lesson: an Arduino Uno, a USB cable, a large breadboard, the 3D-printed traffic light, LEDs for the pedestrians, the buzzer, resistors and jumper wires
- 2 × 470 Ω resistor (yellow-violet-brown)
- 2 × 10 kΩ resistor (brown-black-orange)
Each crossroads (two people) also gets:
- three longer jumper wires (30–50 cm) in three colours: purple for the link, orange for the confirmation (Exercise 6) and black for GND
At the start, each person wires the traffic light exactly as at the end of the last lesson (Exercises 1, 4 and 5) and uploads its whole program. The wiring rules are the same as last time. When the traffic light works as it did last time, you are ready.
Exercise 1: The clock inside the Arduino
While delay() is running, the Arduino does nothing else: it just waits. Traffic light B mustn’t wait like that, because it has to watch the wire all the time. We need a different way of measuring time.
Every Arduino has a built-in stopwatch. It starts when the Arduino is powered on or reset, and it counts milliseconds. The command millis() tells us how far the stopwatch has counted so far.
How much time has passed?
// C++
void setup() {
  Serial.begin(9600);
}

void loop() {
  Serial.println(millis());
  delay(1000);
}
Open the Serial Monitor (9600 baud). Each new number is about 1000 bigger than the one before. Press the reset button on the Arduino: the counting starts from the beginning.
What is new in the program?
millis()– Returns the number of milliseconds since the Arduino was switched on or reset. 1000 ms is one second. We can’t stop the stopwatch or set it back to zero from the program: it always counts on.
How much time has passed since switching on if millis() returns 90000?
Two lights, two rhythms
Now we want the yellow for cars to blink every 0.5 s and the green for pedestrians every 0.3 s. Try to imagine how you would write this with delay(). While we wait half a second for the yellow, we can’t change the green!
With millis() we do it differently, as when we glance at a clock from time to time. We don’t wait; we only check: is it time for a change yet? If not, we carry on.
// C++
const int carYellow = 9;
const int pedestrianGreen = 6;

unsigned long lastYellow = 0;       // when we last changed the yellow
unsigned long lastPedestrian = 0;   // when we last changed the pedestrian green
bool yellowOn = false;
bool pedestrianOn = false;

void setup() {
  pinMode(carYellow, OUTPUT);
  pinMode(pedestrianGreen, OUTPUT);
}

void loop() {
  if (millis() - lastYellow >= 500) {
    lastYellow = millis();
    yellowOn = !yellowOn;
    digitalWrite(carYellow, yellowOn);
  }

  if (millis() - lastPedestrian >= 300) {
    lastPedestrian = millis();
    pedestrianOn = !pedestrianOn;
    digitalWrite(pedestrianGreen, pedestrianOn);
  }
}
Each light blinks in its own rhythm, as if two different programs were running them.
What is new in the program?
unsigned long lastYellow = 0;– Alongis a whole number that can be very big, andunsignedmeans without a sign, so no negative numbers. Such a variable can hold numbers up to about 4.29 billion. We always store the time frommillis()in anunsigned long. On many Arduinos anintonly goes up to 32 767, and in milliseconds that is just 33 seconds.millis() - lastYellow– The current time minus the time of the last change. That is the number of milliseconds that have passed since the last change.if (millis() - lastYellow >= 500)– If at least 500 ms have passed, it is time for a change. If not, the program doesn’t wait, but carries on straight away.lastYellow = millis();– We remember the moment of the change. From it we count the next 500 ms.yellowOn = !yellowOn;– As withledModein lesson 2.1:truebecomesfalse, andfalsebecomestrue.digitalWrite(carYellow, yellowOn);– For the Arduino,trueis the same asHIGH(the number 1), andfalsethe same asLOW(the number 0).- There isn’t a single
delay()inloop(). Soloop()runs thousands of times a second and each time just glances at the clock. In between it can do other things: this program looks after two lights, and traffic light B will also look after the wire.
What happens when the stopwatch is full?
After about 49 days and 17 hours, millis() reaches the biggest number an unsigned long can hold and carries on counting from zero, like the hand of a clock that goes from 12 to 1.
That is why we always write millis() - lastYellow >= 500, with a subtraction. The subtraction gives the correct gap even when the counting goes past zero, just as 2 hours pass from 11 o'clock to 1 o'clock, even though 1 is less than 11. If we had written millis() >= lastYellow + 500, the traffic light would go briefly crazy at that moment: the yellow would flash quickly a few times, and traffic light B could start blinking yellow for no reason.
Experiment: change 300 to 1000, then to 100. Each light changes its rhythm, and the other doesn’t notice the change at all.
Exercise 2: Two Arduinos, one wire
Two people who sit next to each other agree which of them is A and which is B.
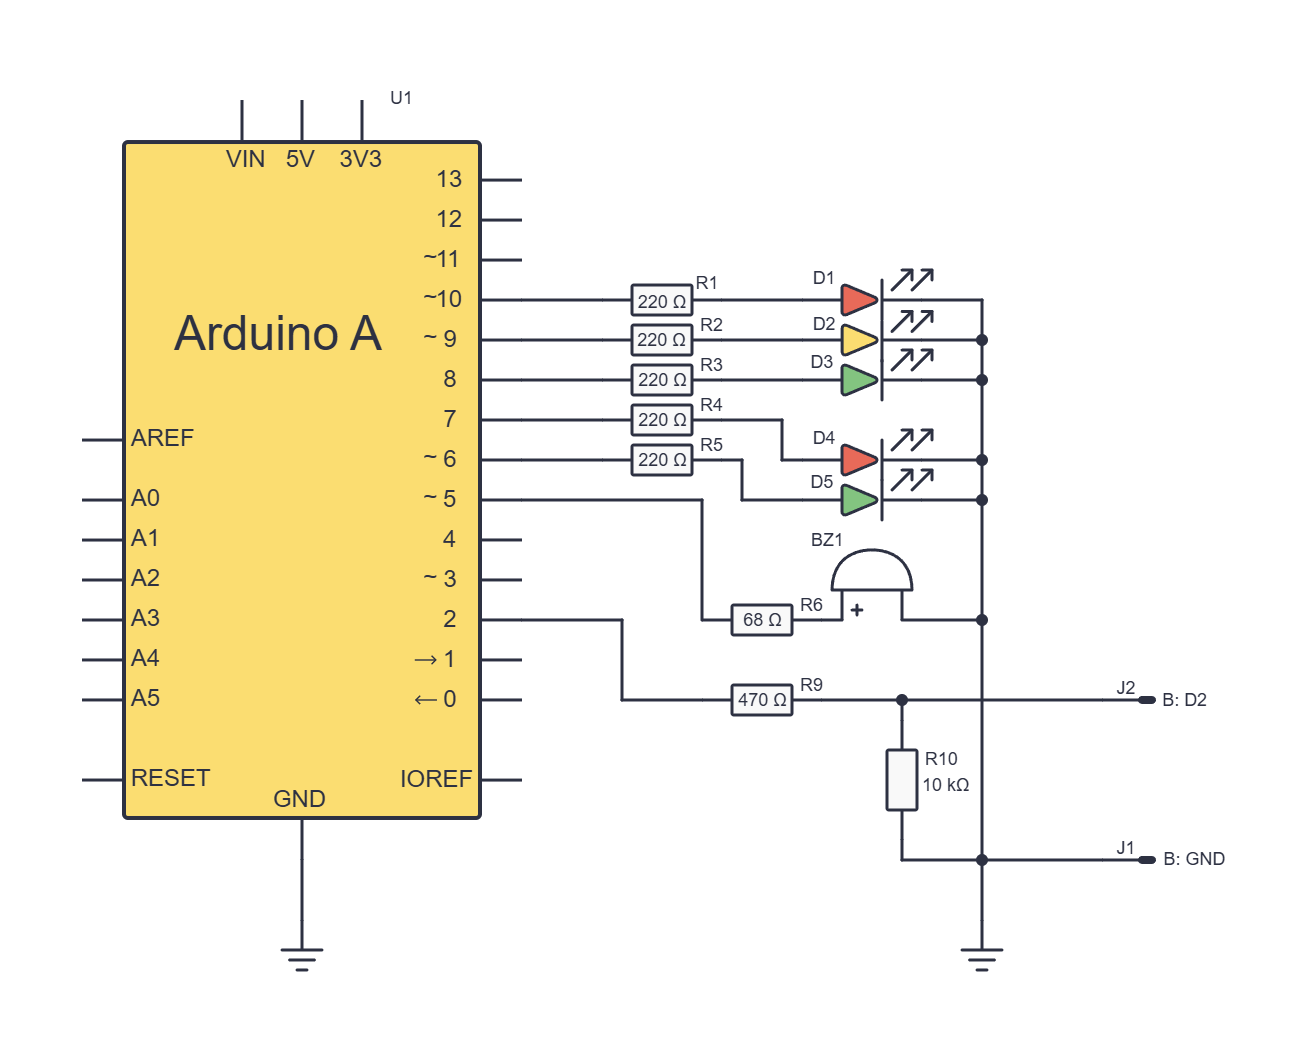
The schematic shows board A. Board B is wired exactly the same. J1 and J2 are connectors: the places where the long wires leave board A. The labels B: D2 and B: GND show which pin of Arduino B each long wire goes to.
Reading a schematic: wires that cross
On a schematic, lines sometimes have to cross, because there is no other way to draw them. So we look out for dots:
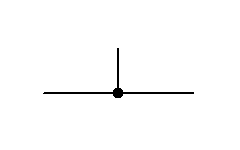 A dot where lines meet means that the wires are connected.
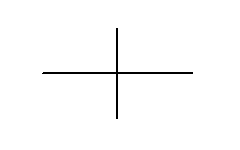 Lines that cross without a dot are not connected: one wire just passes over the other.
Look at our schematic: the wire to B: D2 crosses the vertical GND wire, but there is no dot at that point. So the link and GND are not connected. If they were, the link would always be LOW and B would never go.
Rules for connecting two Arduinos
- While we are wiring, both Arduinos are unplugged from their USB cables.
- Between the two boards we connect only the message wires and GND. We never connect the 5 V pin.
- We wire both boards the same way: for each message wire, each board has its own 470 Ω resistor and its own 10 kΩ resistor. That way we can later swap roles without rewiring.
- Before we plug in the USB cables, the workshop leader checks the circuit.
Wiring
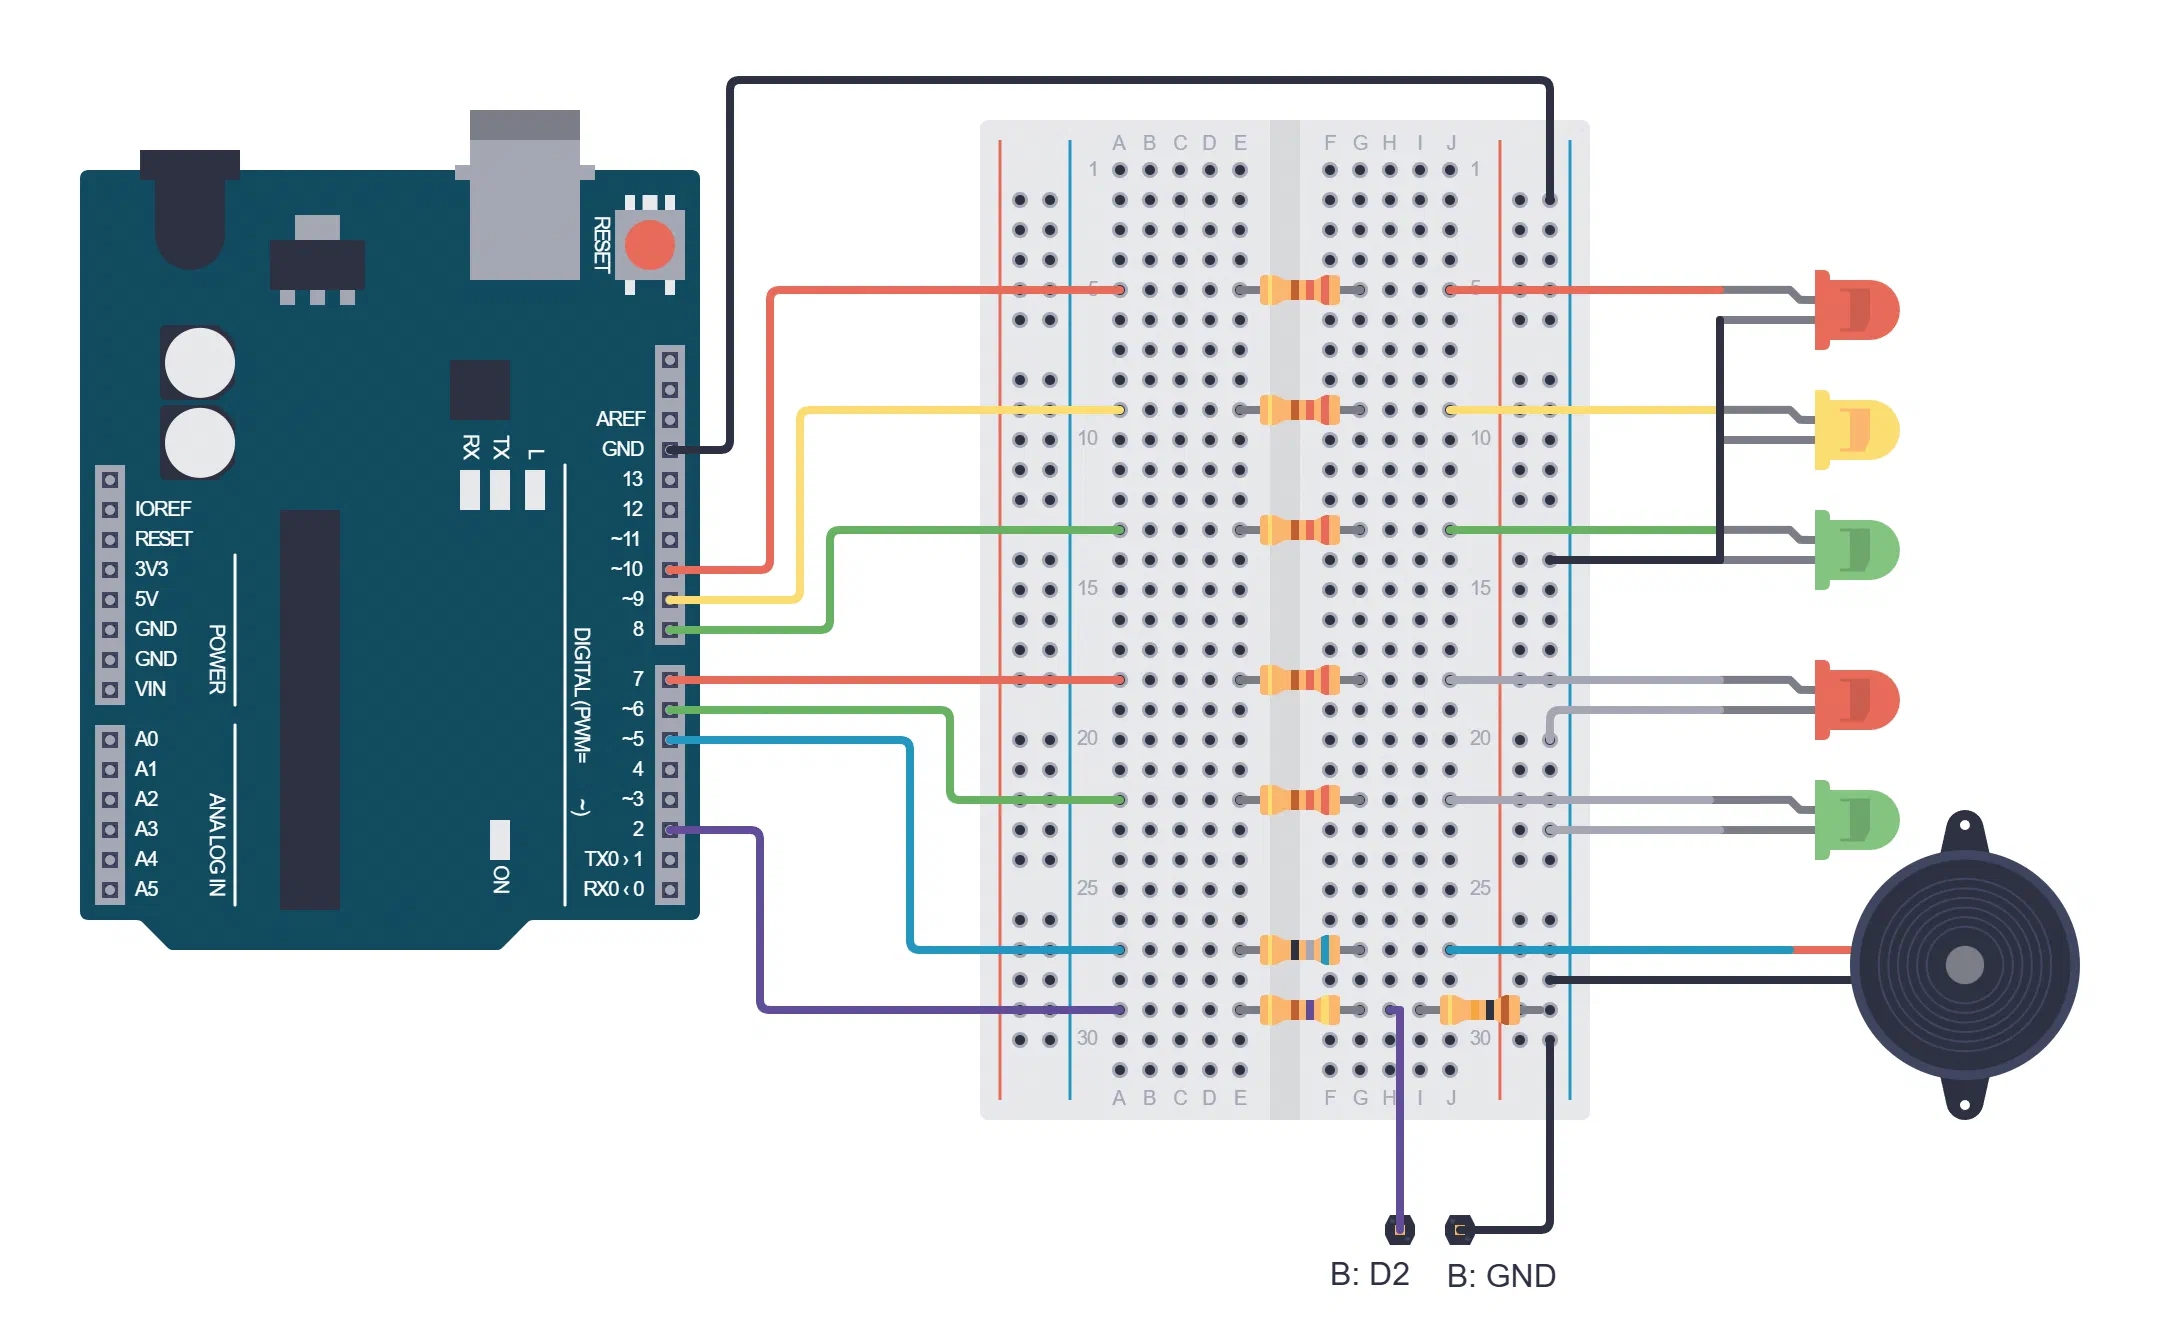
On both boards we add the link in row 29. As last time, the wire from the Arduino goes into the left half of the row, and the resistor crosses the centre gap:
| Part | Arduino pin | Wire from the Arduino | 470 Ω resistor | Right side |
|---|---|---|---|---|
| Link | D2 | a29 | e29–f29 | 10 kΩ resistor from i29 to the right – rail; long link wire in h29 |
Then two long wires connect the boards:
| Wire | Board A | Board B |
|---|---|---|
| Link (purple) | h29 | h29 |
| GND (black) | right – rail | right – rail |
What does each part do?
- Common GND. A voltage is always the difference between two points, like a height: when we say that something is 5 m high, we have to know whether we measure from the floor or from the roof. When A sends 5 V, it means “5 V more than my GND”. B can understand the message only if it measures the voltage from the same GND. Without this wire the message means nothing.
- 10 kΩ resistor: pull-down. In the lesson Arduino - step by step a pull-up resistor pulled the transistor’s base towards +5 V. This resistor pulls the link towards GND, so it is called a pull-down. When nobody is sending
HIGH, for example when the wire is pulled out, the link is reliablyLOW. Without it the pin would be floating: it would pick up interference and readHIGHorLOWat random. This resistor is what makes the link fail-safe: when there is no message, B reads stop. - 470 Ω resistor: protection. What if we upload the program for A to both Arduinos by mistake? Then both pins send a voltage, and when one sends
HIGHand the otherLOW, current would flow straight from one pin into the other. A short circuit like that can damage the pins. By Ohm’s law (I = U / R), with two 470 Ω resistors the current is at most 5 V / 940 Ω ≈ 5 mA, which doesn’t harm the pins. When everything works as it should, only a very small current flows through the resistors and they don’t disturb the message.
Link test
Before the traffic lights, let’s check that the link works. On every Arduino there is a small LED labelled L. It is connected to pin D13, and in the program it is called LED_BUILTIN.
The program for Arduino A sends messages: two seconds HIGH, two seconds LOW. It switches its own L on together with the message.
// C++
const int linkWire = 2;

void setup() {
  pinMode(linkWire, OUTPUT);
  pinMode(LED_BUILTIN, OUTPUT);
}

void loop() {
  digitalWrite(linkWire, HIGH);
  digitalWrite(LED_BUILTIN, HIGH);
  delay(2000);
  digitalWrite(linkWire, LOW);
  digitalWrite(LED_BUILTIN, LOW);
  delay(2000);
}
The program for Arduino B reads the wire and shows on its own L what it has read.
// C++
const int linkWire = 2;

void setup() {
  pinMode(linkWire, INPUT);
  pinMode(LED_BUILTIN, OUTPUT);
}

void loop() {
  int message = digitalRead(linkWire);
  digitalWrite(LED_BUILTIN, message);
}
Upload both programs. L on A and L on B must switch on and off together.
Now pull the long link wire out of h29 on board B. L on B must go out and stay out, even though L on A keeps blinking. This tells us that the pull-down resistor works. Put the wire back.
What is new in the program?
pinMode(linkWire, INPUT);– The pin is an input: the Arduino only measures the voltage on it and doesn’t send any.digitalRead(linkWire)– Reads the pin. It returnsHIGHif the voltage on the pin is close to 5 V, andLOWif it is close to 0 V. It is the partner ofdigitalWrite(): one Arduino writes, and the other reads.int message = digitalRead(linkWire);– We remember the state we read in the variablemessage.digitalWrite(LED_BUILTIN, message);– L shows what B has read: it is on when the message isHIGH.LED_BUILTIN– The name of the pin that the built-in LED L is connected to. We don’t have to remember that it is pin 13.
Exercise 3: Traffic light A is in charge
Exercises 3 and 4 are done at the same time: person A writes the program for traffic light A, and person B the program for traffic light B.
Person A starts from the whole program from the last lesson. The function lights() stays exactly the same. In loop() we add the states from the crossroads table and the messages for B.
Below the other constants, add:
// C++
const int linkWire = 2;        // wire to traffic light B
At the end of setup(), add:
// C++
  pinMode(linkWire, OUTPUT);
  digitalWrite(linkWire, LOW);     // at the start, B stays stopped
Replace loop() with this:
// C++
void loop() {
  lights(HIGH, LOW, LOW, 4000);     // red: B finishes its green and yellow
  lights(HIGH, HIGH, LOW, 1000);    // red + yellow
  lights(LOW, LOW, HIGH, 4000);     // green
  lights(LOW, LOW, BLINK, 2000);    // green blinks
  lights(LOW, HIGH, LOW, 1000);     // yellow
  lights(HIGH, LOW, LOW, 1000);     // red: everyone has stopped

  digitalWrite(linkWire, HIGH);         // message for B: go
  lights(HIGH, LOW, LOW, 5000);     // red: B has red + yellow, then green
  digitalWrite(linkWire, LOW);          // message for B: stop
}
What is new in the program?
pinMode(linkWire, OUTPUT);– A sends messages, so its link pin is an output, like the pins for the LEDs.digitalWrite(linkWire, LOW);– Right at the start we send stop. Until A decides otherwise, B stays stopped.digitalWrite(linkWire, HIGH);– The go message. With the same command we use to switch on an LED, we now send a message to another Arduino.lights(HIGH, LOW, LOW, 5000);– While B is driving, A has red. A also decides how long B has green: 5 s of the go message, of which 1 s is red + yellow and 4 s are green.- Why does
loop()start with 4 s of red? Imagine that A resets while B has green. At that moment the link pin is left without voltage, so B reads stop and starts blinking. A starts from the beginning: firstsetup(), thenloop(). Ifloop()started with red + yellow, A would have green after just 1 s, while B would still be blinking: both roads would be driving! This way A always holds red for 4 s first and gives B enough time to stop. - A may use
delay(). Traffic light A doesn’t listen to anyone; it only talks. While it waits, it can’t miss a message.
If the test program from Exercise 2 is still running on B, L on B lights up exactly when B should have red + yellow and green. Compare that with the lights of traffic light A.
How long does B have green if, in the call lights(HIGH, LOW, LOW, 5000), we change 5000 to 8000?
Exercise 4: Traffic light B listens
Person B also starts from the whole program from the last lesson. The function lights() stays the same, but B no longer measures how long red and green last. It waits for a message.
Below the other constants, add:
// C++
const int linkWire = 2;        // wire from traffic light A
At the end of setup(), add:
// C++
  pinMode(linkWire, INPUT);
Replace loop() with this:
// C++
void loop() {
  lights(HIGH, LOW, LOW, 0);            // red
  while (digitalRead(linkWire) == LOW) {    // wait until A sends go
  }

  lights(HIGH, HIGH, LOW, 1000);        // red + yellow

  if (digitalRead(linkWire) == HIGH) {      // is A still saying go?
    lights(LOW, LOW, HIGH, 0);          // green
    while (digitalRead(linkWire) == HIGH) { // drive until A sends stop
    }
    lights(LOW, LOW, BLINK, 2000);      // green blinks
    lights(LOW, HIGH, LOW, 1000);       // yellow
  }
}
What is new in the program?
while (digitalRead(linkWire) == LOW) { }– Awhileloop repeats the commands between{ }while the condition is true. Here the braces are empty, so the program just reads the wire again and again, thousands of times a second. As soon as A sendsHIGH, the condition is no longer true and the program carries on.fororwhile? We use aforloop when we know how many times to repeat something. We use awhileloop when we are waiting for something to happen and don’t know how long it will take.lights(HIGH, LOW, LOW, 0);– Duration 0: the function sets the lights and returns straight away, without waiting. How long the red lasts isn’t decided by B, but by A.if (digitalRead(linkWire) == HIGH)– During red + yellow, B doesn’t look at the wire for one second, because the functionlights()waits withdelay(). What if A resets during exactly that second? Then B mustn’t switch on green. So before the green we check the wire once more. If it isLOW, B skips the whole green part,loop()starts from the beginning and B goes back to red.- Why may we wait during the blinking and the yellow? After the stop message, A holds red for 4 s anyway and doesn’t send a new message, so B doesn’t miss anything.
- Pedestrians and sound work by themselves. The function
lights()is the same as last time, so B’s pedestrians walk when B has steady green. We didn’t write a single new line for them.
Both traffic lights together
Upload program A to Arduino A and program B to Arduino B. Watch the lights of both traffic lights and compare them with the crossroads table. Check both rules: when one traffic light isn’t showing red, the other shows red, and between them there is always a second when both show red.
Why does B have red after switching on, even though nobody told it to?
loop() starts with red. Then B waits in the while loop until A sends go. If A isn’t running yet, the wire is LOW because of the pull-down resistor, so B stays on red.Exercise 5: When traffic light A breaks down
Pull out the long link wire while B has red. What happens?
B has red and waits. And waits. A fault like this is safe, because nobody drives through on green on the wrong road. But the drivers on road B would wait forever in front of a traffic light that looks perfectly fine. Put the wire back.
Real traffic lights blink yellow when they are out of order. Then drivers know that the traffic light isn’t working and follow the road signs. We will teach our traffic light B to do the same:
- In normal operation, B waits on red for 10 s (from second 3 to second 13 in the crossroads table).
- If it waits longer than 15 s, something is wrong: B starts blinking yellow.
- As soon as A sends go, B carries on normally.
Here we can’t use delay(): B must measure how long it has been waiting, blink yellow and watch the wire at the same time. For that we need millis(), exactly as in Exercise 1.
Changing the program
Below the other constants, person B adds:
// C++
const unsigned long MAX_WAIT = 15000;   // after 15 s without a message: fault

bool yellowOn = false;          // for blinking the yellow during a fault
unsigned long lastBlink = 0;    // when the yellow last changed
Below the function lights(), add a new function:
// C++
void blinkYellow() {
  if (millis() - lastBlink >= 500) {   // half a second has passed
    lastBlink = millis();
    yellowOn = !yellowOn;
    lights(LOW, yellowOn, LOW, 0);     // yellow on or off
  }
}
In loop(), change only the beginning, up to and including the first while loop:
// C++
void loop() {
  lights(HIGH, LOW, LOW, 0);                   // red
  unsigned long waitStart = millis();          // NEW: when we started waiting

  while (digitalRead(linkWire) == LOW) {           // wait until A sends go
    if (millis() - waitStart >= MAX_WAIT) {    // NEW
      blinkYellow();                           // A has been silent for too long
    }
  }

  // the rest of loop() stays the same
What is new in the program?
const unsigned long MAX_WAIT = 15000;– How long B may wait on red. We write the name in capital letters, likeBLINK, because it doesn’t change while the program runs. The type isunsigned longbecause we compare it with the time frommillis().unsigned long waitStart = millis();– We remember the moment when B switched on red. The variable is written insideloop(), so with every new red it gets a new time, and B has the full 15 s again.millis() - waitStart >= MAX_WAIT– The same form as in Exercise 1: how much time has passed since we started waiting? If 15 s or more have passed, A has been silent for too long.void blinkYellow()– The same idea as the yellow in Exercise 1. The important thing is that this function never waits. Each time it is called, it just glances at the clock and, if half a second has passed, changes the yellow. That is why thewhileloop still runs thousands of times a second, and B notices the go message as soon as it arrives.lights(LOW, yellowOn, LOW, 0);– As in Exercise 1,truemeansHIGHandfalsemeansLOW. With one call we get the yellow either on or off.- During a fault the pedestrians wait. The function
lights()lets pedestrians walk only when the cars have steady green, and during a fault they never have it. - What happens when A works again? After switching on, A starts its cycle, and B keeps blinking yellow in the meantime. Only when A sends go does B leave the
whileloop, switch on red + yellow and return to normal operation.
Where do we write variables?
Why do we write lastBlink and yellowOn above setup(), but waitStart inside loop()?
- A variable above
setup()is created once, when the program starts, and keeps its value for as long as the program runs. Every part of the program can use it:loop()and all our functions. - A variable inside
loop(), or inside any other function, is created again on every pass and disappears at the end of the pass. Only the part of the program between the braces where it is written can use it.
The function blinkYellow() is called thousands of times a second, and each time it must know when the yellow last changed and whether it is on now. These values must be remembered between two calls, so we write those variables above setup(). The variable waitStart is needed only during one pass through loop(), and with every new red it gets a new time anyway.
Programmers call the first kind a global variable and the second kind a local variable.
Changing the durations in program A?
Traffic light B may wait on red for at most MAX_WAIT. If you make the cycle in program A so long that B waits longer than 15 s, B will blink yellow even though A is working. Then increase that number in program B too.
Experiments
Start each experiment while both traffic lights are working normally.
1. A broken wire
Pull out the long link wire while B has red. How long does it take before B starts blinking? Put the wire back and watch how B returns to normal operation.
2. Reset
Press the reset button on Arduino A while B has green. What does B do straight away? How long does A hold red after that?
3. A new program
While B has green, upload the program to Arduino A again. Compare what happens with experiment 2.
4. No power
Pull out Arduino A’s USB cable. What does B do? Put the cable back.
Why does B in experiment 1 start blinking before 15 s have passed since the wire was pulled out?
Why are experiments 2, 3 and 4 the same for traffic light B?
LOW, so B reads stop. With every fault B sees the same message, and that message is safe.Exercise 6: A message back
Traffic light A still only trusts that B has stopped. After the stop message it waits 4 s, because it knows that B needs that long for the blinking, the yellow and the second when everyone has red. What if someone makes the yellow longer in program B?
Try it: in program B, in the line with the yellow, change 1000 to 3000. Watch the crossroads after B gets the stop message. A switches on red + yellow while B still has yellow, and straight after that green, without the second when everyone has stopped. At a real crossroads that would be dangerous. Leave 3000 in place; we will need it for a check.
We will fix this with a second wire, going the other way. Through it B tells traffic light A: stopped. After the stop message, A no longer waits a fixed time, but waits for this confirmation.
| State of the return wire | Message from B | What A does |
|---|---|---|
HIGH | stopped: B has red and is waiting for the go message | may carry on: 1 s red, then red + yellow |
LOW | not stopped, or no message | waits on red |
Here too, HIGH means the thing that is safe only when the message really arrives. If the return wire is pulled out or B has no power, the pull-down resistor holds the wire at LOW and A waits. A fault never lets A go to green.
Compare the new timing diagram with the one from the start of the lesson. When everything works normally, the lights change at the same moments. The difference is in traffic light A’s row between seconds 0 and 3: A no longer counts 4 s, but waits for the confirmation. The confirmation arrives as soon as B switches on red, and then A counts 1 more second when everyone has stopped.
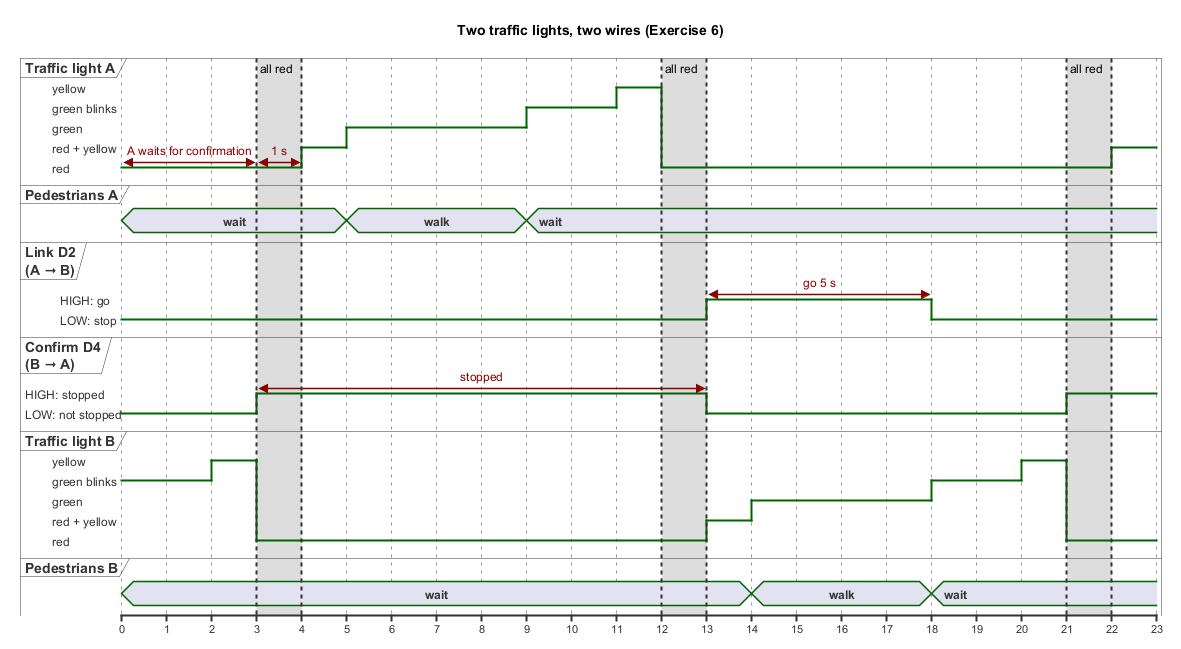
What if the confirmation never arrives? B normally needs 3 s to stop. If A waits longer than 6 s, something is wrong and A starts blinking yellow, just like B in Exercise 5. B then gets no go message, so after 15 s it blinks yellow too. The whole crossroads then blinks yellow, like a real crossroads that is out of order.
Wiring
On both boards we add the confirmation in row 30, in the same way as the link in row 29:
| Part | Arduino pin | Wire from the Arduino | 470 Ω resistor | Right side |
|---|---|---|---|---|
| Confirmation | D4 | a30 | e30–f30 | 10 kΩ resistor from i30 to the right – rail; long confirmation wire in g30 |
A third long wire connects the boards:
| Wire | Board A | Board B |
|---|---|---|
| Confirmation (orange) | g30 | g30 |
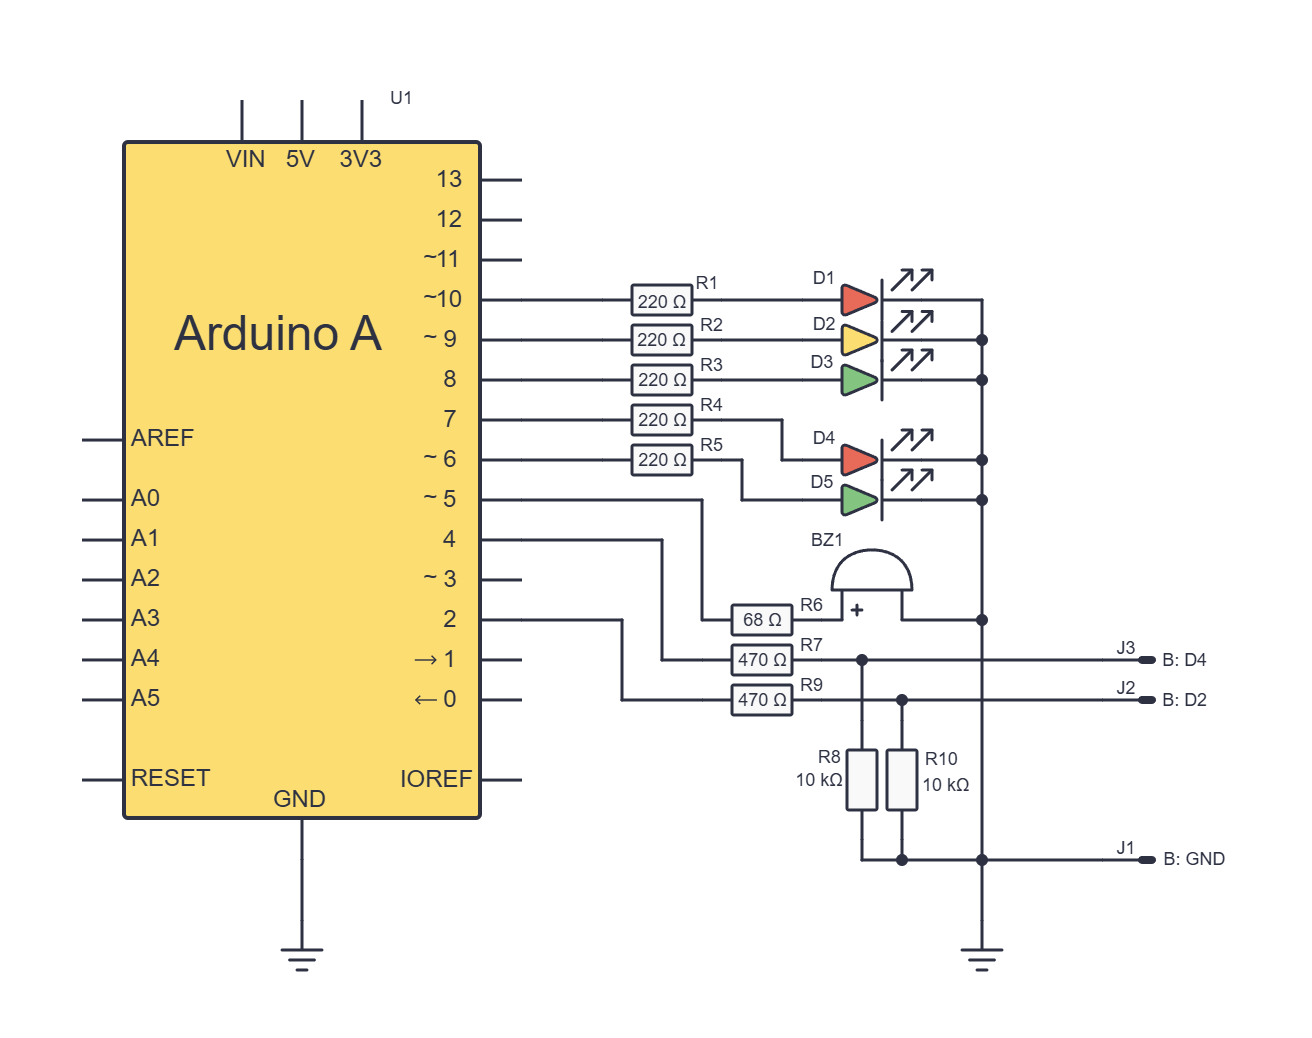
This schematic also shows board A, and board B is wired the same way. The confirmation leaves the board through the new connector J3, labelled B: D4. Watch the crossings here too: resistor R8 passes over the link wire without a dot, so it isn’t connected to it.
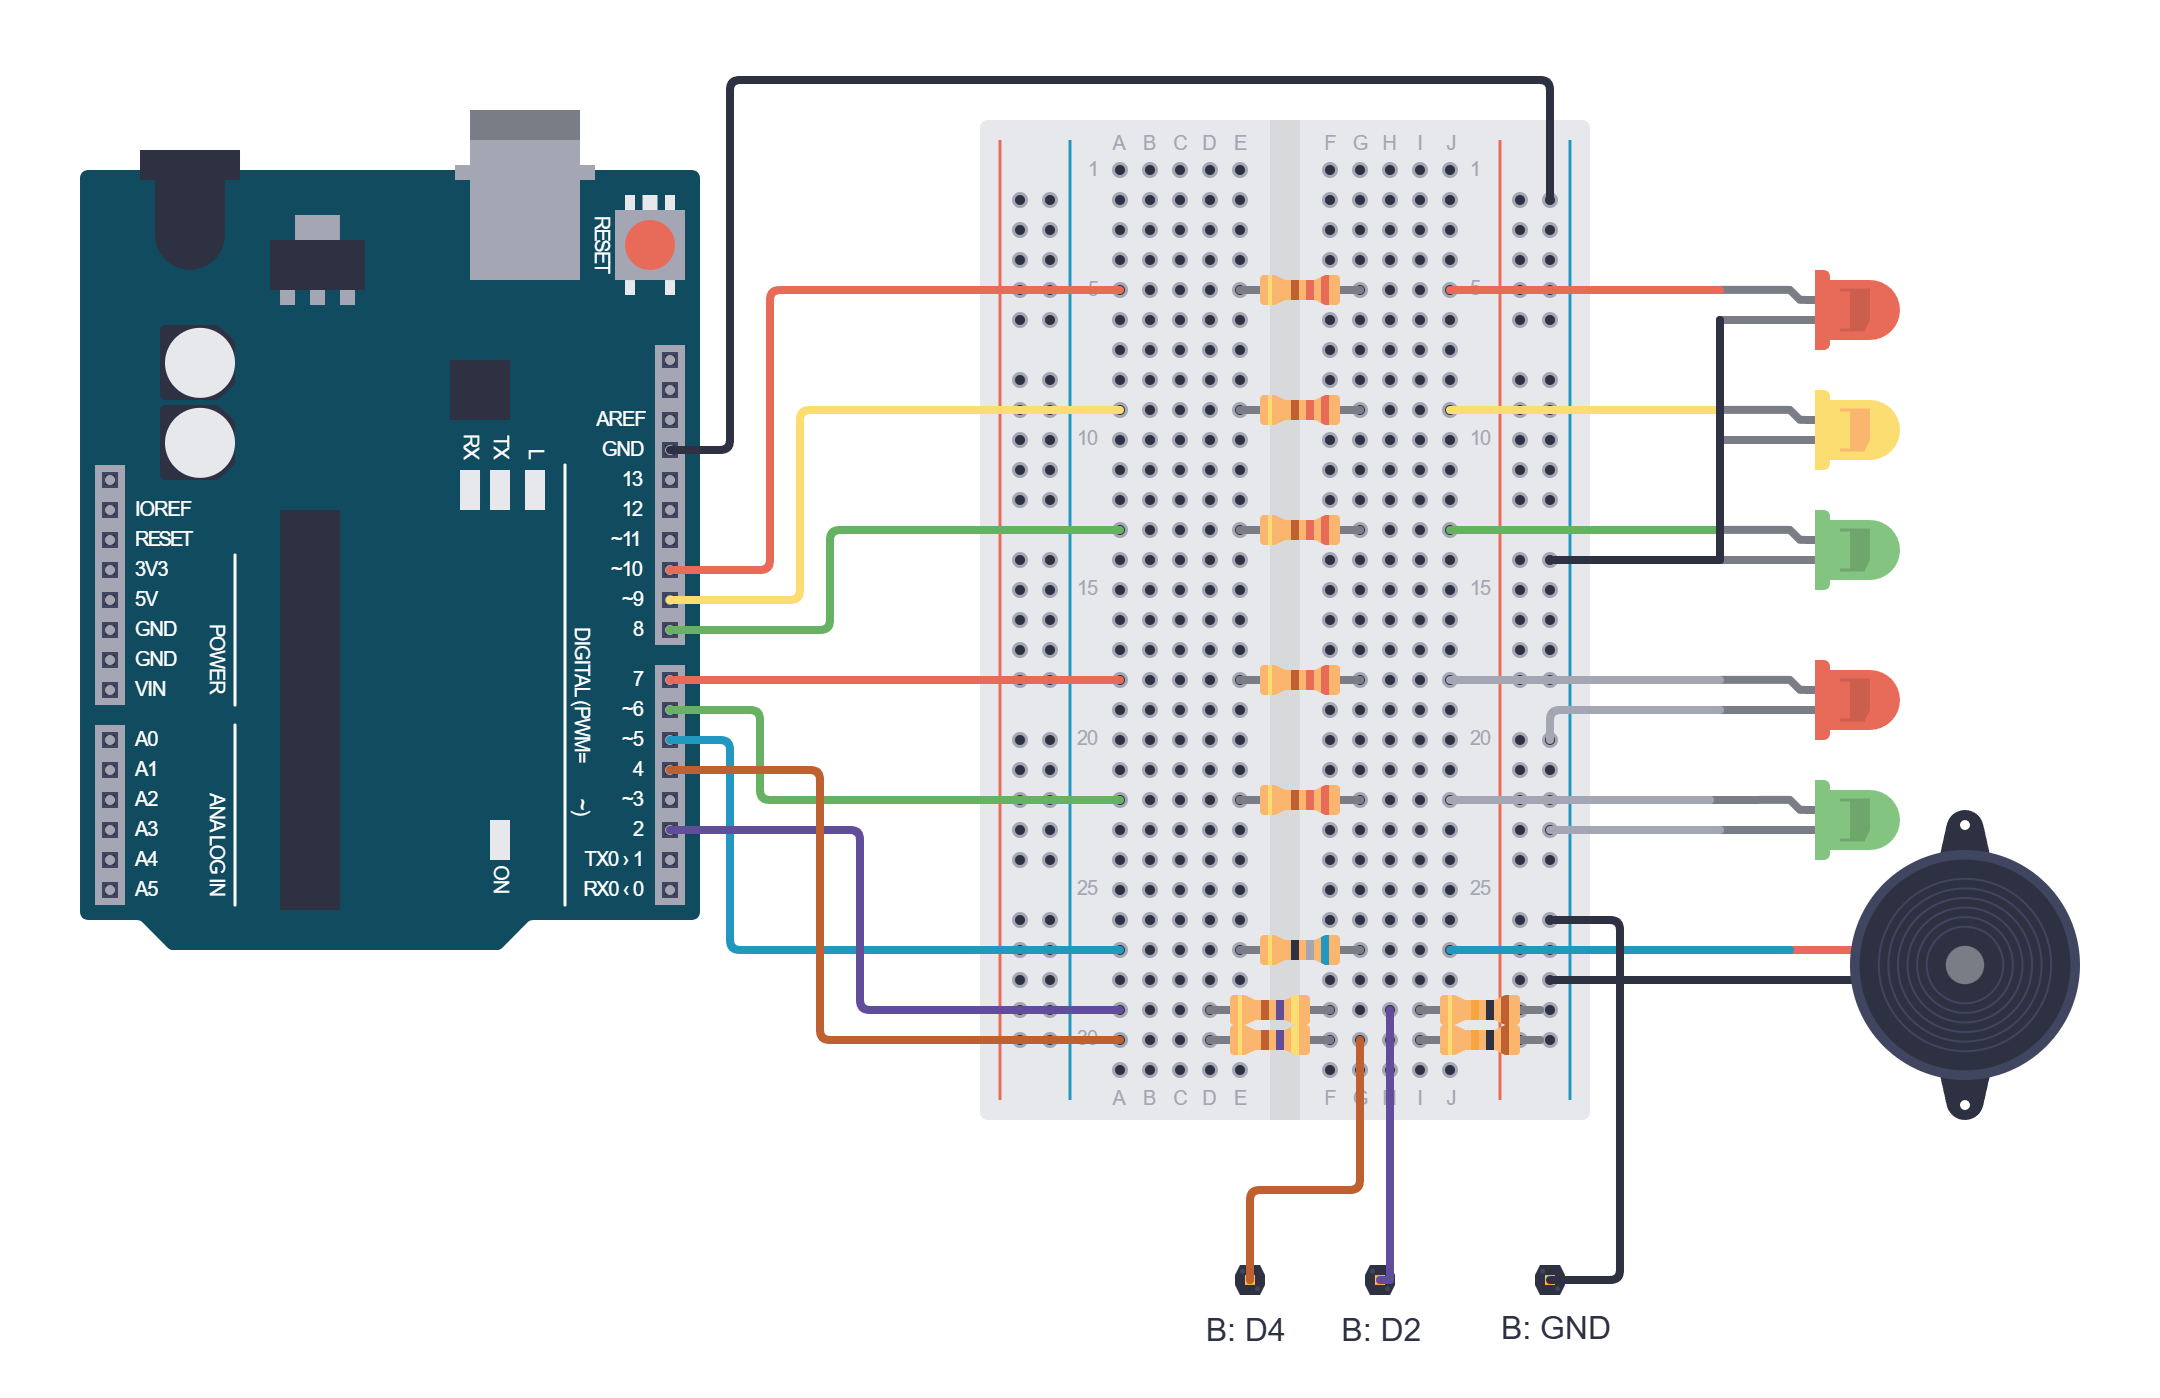
The pins now swap roles: on the return wire, B writes and A reads.
Changing program B
Below the other constants, person B adds:
// C++
const int confirmWire = 4;     // wire to traffic light A: HIGH means "B has stopped"
At the end of setup(), add:
// C++
  pinMode(confirmWire, OUTPUT);
  digitalWrite(confirmWire, LOW);  // until we switch on red, we don't report stopped
In loop(), add the two lines marked NEW:
// C++
void loop() {
  lights(HIGH, LOW, LOW, 0);                   // red
  digitalWrite(confirmWire, HIGH);                 // NEW: tell A: stopped
  unsigned long waitStart = millis();          // when we started waiting

  while (digitalRead(linkWire) == LOW) {           // wait until A sends go
    if (millis() - waitStart >= MAX_WAIT) {
      blinkYellow();                           // A has been silent for too long
    }
  }

  digitalWrite(confirmWire, LOW);                  // NEW: we are moving, no longer stopped
  lights(HIGH, HIGH, LOW, 1000);               // red + yellow

  // the rest of loop() stays the same
What is new in program B?
pinMode(confirmWire, OUTPUT);– On the return wire B sends messages, so pin D4 is an output.digitalWrite(confirmWire, HIGH);after switching on red – First we switch on red, and only then do we report stopped. We never report something that isn’t true yet.digitalWrite(confirmWire, LOW);before red + yellow – First we take back the confirmation, and only then do we move. So at no moment does A think that B has stopped while B already has red + yellow.- Why does B report stopped even while it blinks yellow during a fault? During a fault, B is still waiting for the go message and will never switch on green without it. If it reported not stopped during a fault, after the fault both traffic lights would wait for each other: A would wait for the confirmation, and B for the go message. They would wait forever, even with the wires working again. Programmers call this a deadlock.
Changing program A
Below the other constants, person A adds:
// C++
const int confirmWire = 4;     // wire from traffic light B: HIGH means "B has stopped"
const unsigned long MAX_WAIT = 6000;    // after 6 s without confirmation: fault

bool yellowOn = false;          // for blinking the yellow during a fault
unsigned long lastBlink = 0;    // when the yellow last changed
Below the function lights(), add the function blinkYellow(). It is the same as in program B:
// C++
void blinkYellow() {
  if (millis() - lastBlink >= 500) {   // half a second has passed
    lastBlink = millis();
    yellowOn = !yellowOn;
    lights(LOW, yellowOn, LOW, 0);     // yellow on or off
  }
}
At the end of setup(), add:
// C++
  pinMode(confirmWire, INPUT);
In loop(), replace the first line, lights(HIGH, LOW, LOW, 4000);, with this:
// C++
  lights(HIGH, LOW, LOW, 0);                   // red
  unsigned long waitStart = millis();          // when we started waiting

  while (digitalRead(confirmWire) == LOW) {        // wait until B reports: stopped
    if (millis() - waitStart >= MAX_WAIT) {
      blinkYellow();                           // B has been silent for too long
    }
  }
  lights(HIGH, LOW, LOW, 1000);                // red: everyone has stopped
The rest of loop() stays the same.
What is new in program A?
pinMode(confirmWire, INPUT);anddigitalRead(confirmWire)– The same as for traffic light B in Exercise 2, just the other way round: now A reads.- Do you recognise the
whileloop? It is the same loop that B uses in Exercise 5 to wait for the go message: red, remember when we started waiting, wait for the message, and blink yellow if you wait too long. Only the wire and the longest wait are different. MAX_WAIT = 6000– B normally reports stopped 3 s after the stop message. We give it twice as much time before we decide that something is wrong.lights(HIGH, LOW, LOW, 1000);– B reports stopped the moment it switches on red. So A still has to count the second when everyone has stopped.- When is traffic light A safe now? Before, A guessed how long B needs to stop. Now it knows: however long B’s yellow lasts, A waits for its confirmation. When everything works normally, the cycle still lasts 18 s.
- A now listens too, but only in the
whileloop, where it doesn’t usedelay(). In the rest of the cycle it only talks, so there it may wait withdelay().
Both traffic lights together
Upload the new programs to both Arduinos. If the new program runs on A and the old one on B, B never reports stopped, so after 6 s A starts blinking yellow.
1. A slower B
The yellow in program B still lasts 3 s. Watch the crossroads after the stop message: A now waits for B to stop and only then counts the second when everyone has stopped. The cycle is longer, but safer. Set the yellow back to 1000.
2. A broken return wire
Pull the orange wire out of g30 on board A while A has green. Watch both traffic lights for at least 40 seconds. Which traffic light starts blinking yellow first? Put the wire back and watch how the crossroads returns to normal operation.
Why does A start blinking first in experiment 2, and B only later?
Why does A return to normal operation straight away once the wire is back?
HIGH, leaves the while loop and carries on with its cycle. When A sends go, B also returns to normal operation.Swapping roles
Both boards are wired the same way, so you can swap roles without rewiring. Person A now writes the program for B (Exercises 4, 5 and 6), and person B the program for A (Exercises 3 and 6). When you upload the new programs, the crossroads must work exactly as before.
The whole program: traffic light A
// C++
const int carRed = 10;
const int carYellow = 9;
const int carGreen = 8;
const int pedestrianRed = 7;
const int pedestrianGreen = 6;
const int buzzer = 5;
const int linkWire = 2;        // wire to traffic light B
const int confirmWire = 4;     // wire from traffic light B: HIGH means "B has stopped"

const int BLINK = 2;                // a third value next to LOW (0) and HIGH (1)
const unsigned long MAX_WAIT = 6000;    // after 6 s without confirmation: fault

bool pedestriansWalking = false;    // remembers whether the pedestrians had green
bool yellowOn = false;              // for blinking the yellow during a fault
unsigned long lastBlink = 0;        // when the yellow last changed

void lights(int red, int yellow, int green, int duration) {
  digitalWrite(carRed, red);
  digitalWrite(carYellow, yellow);

  // Pedestrians walk only when the cars have steady green.
  if (green == HIGH && red == LOW && yellow == LOW) {
    digitalWrite(pedestrianRed, LOW);
    digitalWrite(pedestrianGreen, HIGH);
    if (!pedestriansWalking) {     // they have just got green
      tone(buzzer, 800, 60);       // short higher sound: go
      pedestriansWalking = true;
    }
  } else {
    digitalWrite(pedestrianRed, HIGH);
    digitalWrite(pedestrianGreen, LOW);
    if (pedestriansWalking) {      // they have just got red
      tone(buzzer, 150, 150);      // short lower sound: stop
      pedestriansWalking = false;
    }
  }

  if (green == BLINK) {
    for (int t = 0; t < duration; t = t + 500) {
      digitalWrite(carGreen, LOW);
      delay(250);
      digitalWrite(carGreen, HIGH);
      delay(250);
    }
  } else {
    digitalWrite(carGreen, green);
    delay(duration);
  }
}

void blinkYellow() {
  if (millis() - lastBlink >= 500) {   // half a second has passed
    lastBlink = millis();
    yellowOn = !yellowOn;
    lights(LOW, yellowOn, LOW, 0);     // yellow on or off
  }
}

void setup() {
  pinMode(carRed, OUTPUT);
  pinMode(carYellow, OUTPUT);
  pinMode(carGreen, OUTPUT);
  pinMode(pedestrianRed, OUTPUT);
  pinMode(pedestrianGreen, OUTPUT);
  pinMode(buzzer, OUTPUT);
  pinMode(linkWire, OUTPUT);
  digitalWrite(linkWire, LOW);          // at the start, B stays stopped
  pinMode(confirmWire, INPUT);
}

void loop() {
  lights(HIGH, LOW, LOW, 0);                   // red
  unsigned long waitStart = millis();          // when we started waiting

  while (digitalRead(confirmWire) == LOW) {        // wait until B reports: stopped
    if (millis() - waitStart >= MAX_WAIT) {
      blinkYellow();                           // B has been silent for too long
    }
  }
  lights(HIGH, LOW, LOW, 1000);                // red: everyone has stopped

  lights(HIGH, HIGH, LOW, 1000);    // red + yellow
  lights(LOW, LOW, HIGH, 4000);     // green
  lights(LOW, LOW, BLINK, 2000);    // green blinks
  lights(LOW, HIGH, LOW, 1000);     // yellow
  lights(HIGH, LOW, LOW, 1000);     // red: everyone has stopped

  digitalWrite(linkWire, HIGH);         // message for B: go
  lights(HIGH, LOW, LOW, 5000);     // red: B has red + yellow, then green
  digitalWrite(linkWire, LOW);          // message for B: stop
}
The whole program: traffic light B
// C++
const int carRed = 10;
const int carYellow = 9;
const int carGreen = 8;
const int pedestrianRed = 7;
const int pedestrianGreen = 6;
const int buzzer = 5;
const int linkWire = 2;        // wire from traffic light A
const int confirmWire = 4;     // wire to traffic light A: HIGH means "B has stopped"

const int BLINK = 2;                // a third value next to LOW (0) and HIGH (1)
const unsigned long MAX_WAIT = 15000;   // after 15 s without a message: fault

bool pedestriansWalking = false;    // remembers whether the pedestrians had green
bool yellowOn = false;              // for blinking the yellow during a fault
unsigned long lastBlink = 0;        // when the yellow last changed

void lights(int red, int yellow, int green, int duration) {
  digitalWrite(carRed, red);
  digitalWrite(carYellow, yellow);

  // Pedestrians walk only when the cars have steady green.
  if (green == HIGH && red == LOW && yellow == LOW) {
    digitalWrite(pedestrianRed, LOW);
    digitalWrite(pedestrianGreen, HIGH);
    if (!pedestriansWalking) {     // they have just got green
      tone(buzzer, 800, 60);       // short higher sound: go
      pedestriansWalking = true;
    }
  } else {
    digitalWrite(pedestrianRed, HIGH);
    digitalWrite(pedestrianGreen, LOW);
    if (pedestriansWalking) {      // they have just got red
      tone(buzzer, 150, 150);      // short lower sound: stop
      pedestriansWalking = false;
    }
  }

  if (green == BLINK) {
    for (int t = 0; t < duration; t = t + 500) {
      digitalWrite(carGreen, LOW);
      delay(250);
      digitalWrite(carGreen, HIGH);
      delay(250);
    }
  } else {
    digitalWrite(carGreen, green);
    delay(duration);
  }
}

void blinkYellow() {
  if (millis() - lastBlink >= 500) {   // half a second has passed
    lastBlink = millis();
    yellowOn = !yellowOn;
    lights(LOW, yellowOn, LOW, 0);     // yellow on or off
  }
}

void setup() {
  pinMode(carRed, OUTPUT);
  pinMode(carYellow, OUTPUT);
  pinMode(carGreen, OUTPUT);
  pinMode(pedestrianRed, OUTPUT);
  pinMode(pedestrianGreen, OUTPUT);
  pinMode(buzzer, OUTPUT);
  pinMode(linkWire, INPUT);
  pinMode(confirmWire, OUTPUT);
  digitalWrite(confirmWire, LOW);       // until we switch on red, we don't report stopped
}

void loop() {
  lights(HIGH, LOW, LOW, 0);                   // red
  digitalWrite(confirmWire, HIGH);                 // tell A: stopped
  unsigned long waitStart = millis();          // when we started waiting

  while (digitalRead(linkWire) == LOW) {           // wait until A sends go
    if (millis() - waitStart >= MAX_WAIT) {
      blinkYellow();                           // A has been silent for too long
    }
  }

  digitalWrite(confirmWire, LOW);                  // we are moving, no longer stopped
  lights(HIGH, HIGH, LOW, 1000);               // red + yellow

  if (digitalRead(linkWire) == HIGH) {      // is A still saying go?
    lights(LOW, LOW, HIGH, 0);          // green
    while (digitalRead(linkWire) == HIGH) { // drive until A sends stop
    }
    lights(LOW, LOW, BLINK, 2000);      // green blinks
    lights(LOW, HIGH, LOW, 1000);       // yellow
  }
}
If something doesn’t work
- In the link test, L on B doesn’t follow L on A ⇒ Is the black wire connected between the right – rails of both boards? Is the long link wire in h29 on both boards? Are the wires from D2 in a29, and the 470 Ω resistors in e29–f29?
- L on B is on even when the link wire is pulled out ⇒ The 10 kΩ resistor on board B isn’t connected between i29 and the right – rail.
- B has red all the time, and after 15 s it blinks yellow ⇒ The message isn’t reaching B. Repeat the link test from Exercise 2 and check that program A is uploaded to Arduino A.
- B blinks yellow even though A is working ⇒ Did you make the durations in program A longer? Increase
MAX_WAITin program B. - After the stop message A doesn’t carry on, but blinks yellow after 6 s ⇒ The confirmation isn’t reaching A. Check the orange wire (g30 on both boards), the wires from D4 in a30, the 470 Ω resistors in e30–f30 and the 10 kΩ resistors from i30. Is the program from Exercise 6 uploaded to Arduino B?
- A blinks yellow even though the confirmation arrives ⇒ Did you make the blinking or the yellow longer in program B? If B needs more than 6 s to stop, increase
MAX_WAITin program A. - Each traffic light runs on its own, or both blink yellow straight after switching on ⇒ Program A is uploaded to both Arduinos. The 470 Ω resistors protect the pins, but program B must be uploaded to Arduino B.
- Both traffic lights have red all the time, and then they blink yellow ⇒ Program B is uploaded to both Arduinos, so nobody sends messages.
- The program won’t upload ⇒ Each Arduino is connected to its own computer. Check that the Arduino Uno board and the right port are selected in the Arduino IDE, on the computer that the Arduino you are programming is connected to.
Extra challenges
- Give B a longer green than A, for example 6 s. Which program do you have to change? Do you also have to watch out for
MAX_WAIT? - Make A print in the Serial Monitor how many milliseconds it waited for B’s confirmation. Hint: straight after the
whileloop, calculatemillis() - waitStart. How long does A usually wait? What happens to this number when you make the yellow longer in program B?
 What did we learn?
millis()returns the number of milliseconds since the Arduino was switched on or reset.- We store the time from
millis()in anunsigned long, because anintcan be too small for it. - We check how much time has passed with a subtraction:
millis() - last >= duration. - A program without
delay()doesn’t wait, but just glances at the clock, so it can keep track of several things at the same time. pinMode(pin, INPUT)anddigitalRead()read whether a pin isHIGHorLOW.- A
whileloop repeats commands while a condition is true. We use it when we are waiting for something to happen. - Two Arduinos can talk over a wire: one writes with
digitalWrite(), the other reads withdigitalRead(). They must have a common GND. - A pull-down resistor holds a pin at
LOWwhen nobody is sending a voltage. - A link is fail-safe when every fault means stop.
- When two devices must work together, the simplest way is to have one in charge.
- A message back (a confirmation) replaces guessing: A doesn’t calculate how long B needs to stop, but waits for B to report it.
- If two devices wait for each other, they can wait forever. We prevent such a deadlock by carefully choosing what each of them reports.
A little quiz
1. What is the difference between delay(500) and the check millis() - last >= 500?
delay(500) stops the program for half a second, and during that time the Arduino does nothing else. The check with millis() doesn’t wait: it just looks whether half a second has passed and carries on straight away. That is why a program with millis() can keep track of several things at the same time.2. Why do we store the time from millis() in an unsigned long, and not in an int?
int only goes up to 32 767, and millis() passes that number after just 33 seconds. An unsigned long holds numbers up to about 4.29 billion, which is more than 49 days in milliseconds.3. Why does LOW on the wire mean stop, and not go?
LOW: when the wire is pulled out, when A has no power and when A resets. If LOW meant go, every fault would let cars onto road B. This way every fault means stop.4. What is the 10 kΩ resistor for, and what is the 470 Ω resistor for?
LOW when nobody is sending a voltage, so the pin isn’t floating. The 470 Ω resistor is protection: if both Arduinos send a voltage by mistake, one HIGH and the other LOW, the current through both resistors is at most about 5 mA and the pins aren’t damaged.5. Why must the two Arduinos have a common GND?
6. Why did A wait 4 s after the stop message in Exercise 3, while in Exercise 6 it waits for a confirmation?
loop(), A waits for the confirmation.7. Why mustn't the function blinkYellow() use delay()?
delay() was running, B wouldn’t read the wire and couldn’t notice the go message straight away. A function without delay() just glances at the clock and returns straight away, so the while loop reads the wire thousands of times a second.8. Why does B report stopped only after it switches on red, and take the confirmation back before it switches on red + yellow?
HIGH only while it is true, that is, while B really has red and is waiting. So B first switches on red and then reports stopped, and before moving off it first takes back the confirmation and only then switches on red + yellow. That way A never gets a wrong message.