Safety in the electronics workshop
We work like engineers — we plan, build, measure and test
Welcome to the electronics workshop!
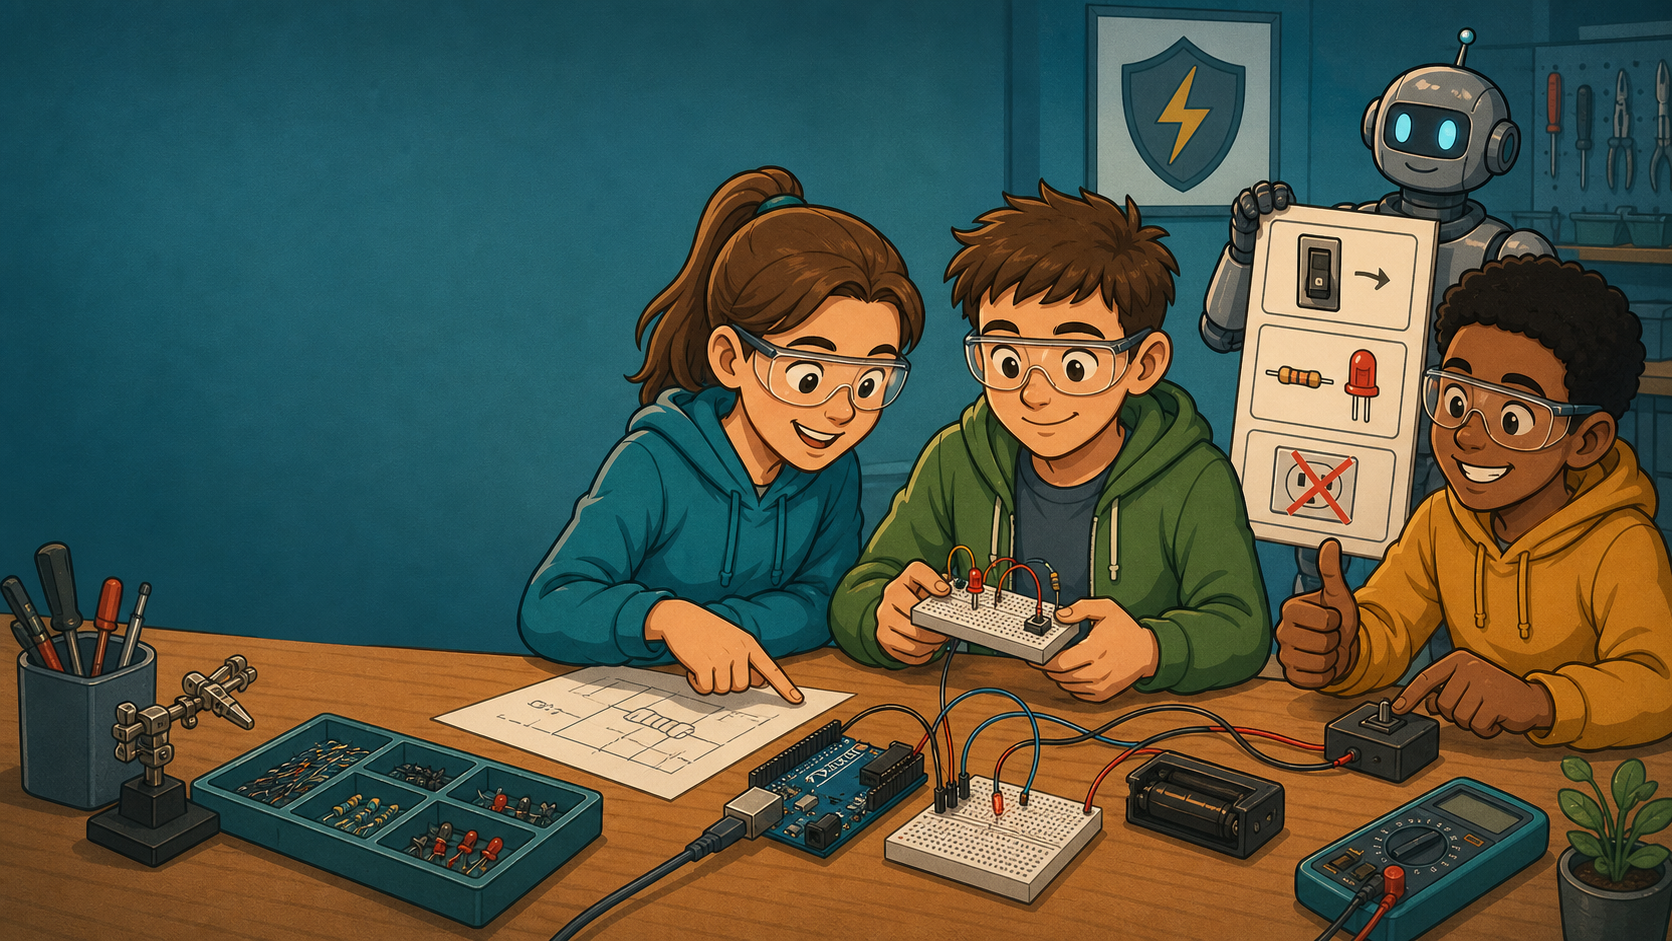
This year we won’t just program the Arduino. We will build real electronic circuits: lights, push buttons, alarms, sensors, buzzers, displays, parts of various devices and models of the automation used in homes.
We will work with breadboards, LEDs, resistors, wires, batteries, USB power, Arduino and similar microcontrollers, sensors, small motors and, later on, boards for building permanent circuits.
Electronics is exciting because we can come up with an idea, build it, test it and fix it. But a good engineer doesn’t only think about whether the project will work. They also think about whether the project is safe.
The goal isn’t just to make something light up or move. The goal is to understand:
- where the energy comes from,
- which path the current takes,
- why a component is needed,
- how the Arduino controls a device,
- how to measure and find a fault,
- how to build a circuit that is safe, tidy and repeatable.
Electronics combines physics, programming, electronic and user design, and careful work. A good project isn’t just one that works once. A good project is one you can explain, test, repair and safely use again.
We don’t work with:
- wall sockets and 230 V mains voltage,
- opened-up chargers and adapters,
- dismantled household appliances,
- damaged cables,
- electrical installations or devices plugged into the wall,
- unknown batteries, chargers or modules brought from home.
In the home automation project we can build a model of a smart room: automatic lighting, a fan, an alarm, temperature measurement or LED lighting control. These are models of real systems, but we don’t connect them to a real mains installation.
Important!
Home automation can be the inspiration for a project, but mains voltage is not what we experiment with.We work as engineering teams
The computer, the Arduino and the breadboard are not toys. They are the tools we use to design, test and control devices.
These rules apply in the workshop:
In the workshop we work like real engineers. That means we listen to the leader carefully, follow the instructions step by step, think and ask when we don't understand something.
- We use the computer for programming, documentation, simulation and research that is part of the workshop.
- When the leader is explaining something, we watch, listen, don't change the circuit and don't click on the computer.
- We don't open games, YouTube, social media, other websites or programs that aren't part of the workshop.
- Playing games on the computer during the workshop is not allowed.
- The computer is not a toy: it is our tool for programming, exploring and controlling our projects.
- If we finish a task early, we don't start a game on our own. We ask the leader for an extra challenge, help another team or move on to the next task.
- If we don't know what to do, we first raise our hand and ask – we don't click around or change the program at random.
- We don't change someone else's circuit without permission from that team member and the leader.
- Before the power is switched on, the members of each team quickly check each other's circuit.
A good engineer doesn't guess. A good engineer observes, checks, measures and only then changes the circuit.
The most important workshop rules
Remember these 10 rules
- We only use the components (parts), batteries, cables and power supplies the leader has prepared.
- We don't touch wall sockets, chargers, bare cables or devices plugged into the wall.
- We never connect the plus and minus of a power source directly with just a wire.
- Before moving a wire, swapping a component or making any change on the breadboard, we switch off the power.
- An LED always needs a suitable resistor or another circuit designed to limit the current.
- Water, drinks, food and wet hands don't belong near electronics.
- If something gets hot, smokes, smells of burning, makes an unusual noise or behaves unexpectedly, we stop work immediately and call the leader.
- We don't take apart, pierce, squash or charge batteries unless they are marked as rechargeable and the leader has prepared the charging.
- An Arduino pin is not a power source for every device. Motors, servo motors, relays, LED strips and electromagnets often need a separate driver circuit and a suitable power supply.
- A project is only finished when the power is off, the table is tidy, the parts are put away and the results have been recorded.
A safe workbench
Before we start, only what we need for the current task may be on the table.
Allowed on the table:
- the breadboard or PCB we are working with right now,
- the components for the current step,
- the Arduino and USB cable when they are needed,
- a battery holder or the planned low-voltage source,
- instructions, the schematic, notes, a pencil and a multimeter when we take measurements,
- a small container or mat for components that aren’t connected at the moment.
Not allowed on the table:
- drinks, open bottles, water, juice, food and sweets,
- unknown chargers, batteries, cables or electronic modules,
- unnecessary piles of wires and parts,
- metal objects that aren’t part of the activity, such as keys and coins,
- a mobile phone in the area where the circuit is being built, unless it is used with permission to document the project.
A tidy table isn’t just about looks. Being tidy means fewer wrong connections, makes it easier to check the schematic and stops small components from getting lost.
Energy, voltage and current
Every electronic circuit needs a source of energy. This can be a battery, a USB power supply or a bench power supply.
To start with, we use this practical model:
- voltage is the difference in electric potential that pushes current through the circuit.
- current is the amount of electric charge that flows through a conductor.
- resistance limits the flow of current.
- power tells us how much energy is used or converted into light, sound, heat or movement.
In simple circuits, Ohm’s law applies:
- U – voltage, measured in volts [V]
- I – current, measured in amperes [A]
- R – resistance, measured in ohms [Ω]
We don’t have to solve complicated problems straight away, but we do need to understand the consequence: if we connect a component without a suitable current limit, more current can flow through it than it can safely handle.
What is a short circuit?
A short circuit happens when we connect the plus and minus of a power source almost directly, without a useful load or a current limit.
An example of a bad connection is joining the plus (+) and minus (-) terminals of a battery with just a wire.
Such a connection can:
- heat up the wire or the battery,
- drain the battery quickly,
- trip the protection of the USB power supply,
- damage the breadboard, a cable, the Arduino or another component,
- produce a smell, smoke or heat.
We never test a short circuit on purpose. If we suspect there is one, we first switch off the power and then check the circuit.
Batteries and power
A battery has two terminals:
- Plus ( + )
- Minus ( − )
For our circuit to work, energy has to travel around a carefully built, closed electric circuit: from the plus of the battery, through the parts of the project, and then back to the minus.
For a simple LED, this path includes the battery, the resistor, the LED and the wires. In an Arduino project, the path can also include a sensor, a control pin, a transistor, a motor driver or another interface.
Battery rules
- We only use batteries of the same type and of the voltage system intended for the project.
- We don’t mix old and new batteries.
- We don’t mix different types of batteries.
- We put batteries in following the plus and minus marks.
- We don’t use batteries that are damaged, swollen, leaking or unusually hot.
- We don’t leave a battery circuit switched on when nobody is keeping an eye on the project.
- After work, we switch off the battery holder or disconnect the power source as the leader instructs.
- Rechargeable batteries are charged only by an adult or according to a procedure agreed in advance.
Button batteries
Button batteries, the small flat round ones, are not free materials to work with. If you find one, hand it to the leader straight away.
We never put them in a pocket, give them to someone else, take them apart or put them in our mouth. If anyone might have swallowed a button battery, an adult must arrange urgent medical help immediately.
Breadboard, LEDs and components
A breadboard lets us build and test a circuit without soldering. It is a prototyping board, not a permanent product.
It is important to know that the holes on a breadboard are not all connected to each other. Under the plastic there are conductive rows and columns. Before we start, we need to know:
- where the power rails are
- which rows are connected to each other
- where the centre channel is
- when a component has to be placed across the centre channel
- where plus and minus are in our particular circuit
Breadboard rules
- We insert wires and components gently, without force.
- We don’t move parts while the power is switched on.
- We don’t put two legs of a component into the same conductive row at random.
- We don’t assume that the power rails are connected along the whole length of the breadboard; we check its layout first.
- We don’t pull wires out by tugging on the cable.
- After testing, we take the circuit apart only as the leader instructs, or we document it before taking it apart.
LEDs and resistors
An LED has polarity:
- the longer leg is usually the anode and goes towards the more positive voltage
- the shorter leg is usually the cathode and goes towards minus
- the flat side of the LED’s body usually marks the cathode
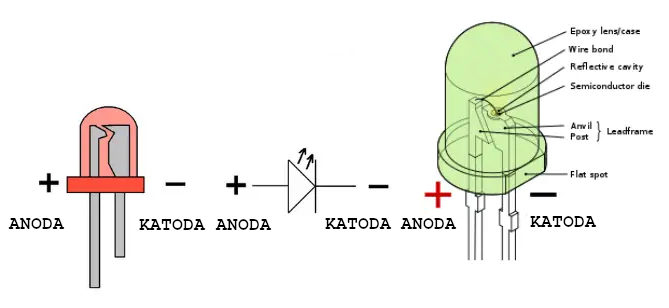
An LED is not an ordinary light bulb. The current through an LED has to be limited with a resistor or a suitable driver.
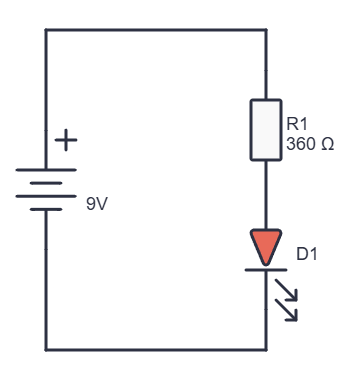
For a simple resistor calculation we can use:
For the circuit in the schematic above, the values are:
- Usource = 9 V
- ULED = 1.8 V
- ILED = 20 mA = 0.020 A
which gives us this calculation:\[ R = \frac{9 V - 1.8 V}{0.020 A} = \frac{7.2 V}{0.020 A} = 360 Ω \]
In the first exercises we use resistors chosen by the leader. Later we will learn to work out a suitable value ourselves.
We don’t stare for a long time, from very close, into very bright white, blue or focused LEDs.
The Arduino and controlling devices
The Arduino is a microcontroller. It reads inputs – such as push buttons and sensors – runs the program and sends outputs to LEDs, buzzers, displays or driver circuits.
An important safety and technical difference:
The Arduino can send a signal, but it can't directly power every device.A small LED output can be controlled from an Arduino pin if it is connected correctly and the current is limited. However, motors, servos, relays, electromagnets, LED strips and more powerful speakers may need more current than an Arduino pin or the USB port is allowed to supply.
For devices like these we use suitable components:
- a transistor or MOSFET as an electronic switch,
- diodes to protect against the reverse voltage from motors and relays,
- a motor driver for DC motors,
- a separate power supply for motors and larger loads,
- a common ground (GND) between the control part and the power part when needed,
- a fuse, current limiting or a protection module when the project needs it.
We don’t connect a motor, servo, relay or electromagnet directly to an Arduino pin just because the component has three wires or a connector that looks like it fits.
Motors and moving parts in projects
Projects will have push buttons, switches, lights, sounds and possibly moving parts. Moving parts bring extra risks: they can pull on a wire, jam, draw more current than expected or physically hit part of the circuit.
When working with motors, servos and electromagnets:
- We keep our fingers away from moving parts while the power is on.
- We repair, adjust or take apart the mechanics only when the power is off.
- We don’t stop a motor with our hand without permission.
- We don’t connect motors to an Arduino pin without the planned driver circuit.
- We don’t use strong electromagnets, large solenoids or improvised power supplies.
- If a motor, cable, driver or battery gets hot, we stop work immediately.
- Before starting a whole project module, we check that the cables are secured and that there are no loose metal parts.
Soldering and printed circuit boards
The breadboard is for prototypes. When we want to make a more permanent module, we can use perfboard or a printed circuit board.
Careful!
A soldering iron is not a toy. Its tip is hot enough to cause burns and to damage plastic, cables or the table.Soldering rules:
- We only solder when the leader has confirmed that the circuit has been checked.
- We always put the soldering iron back in its stand.
- We don’t touch the tip of the soldering iron, the metal part of the tool or fresh solder.
- We don’t leave the soldering iron among cables or lying on the work surface.
- We work on the mat provided.
- We don’t lean our face directly over the spot we are soldering and we don’t breathe in the fumes.
- We don’t eat or drink at the soldering table.
- We wash our hands after soldering.
- Before soldering, we check the polarity of LEDs, diodes, capacitors, integrated circuits and connectors.
- Before a permanent circuit is switched on for the first time, the leader or another team member inspects the connections.
The most common mistake in first PCB projects isn’t a bad solder joint, but a component in the wrong place, reversed polarity, the wrong pin order, or soldering before the prototype has been tested.
Rule: switch off before you change anything
The most important workshop rule is: First switch off the power. Then change the circuit.
We switch off the power before we:
- move a wire
- swap a resistor
- add or turn round an LED
- connect the Arduino to an external circuit
- add a push button, sensor, buzzer or display
- connect a motor, servo or relay module
- change the power supply
- repair a mechanical part of the pinball machine
- take apart or upgrade a prototype
This rule protects the components, makes a short circuit less likely and lets us find mistakes systematically.
If something doesn’t work: debugging
In electronics it is normal for a circuit not to work on the first try. That is not a sign of failure – it is part of the work.
Debugging means systematically finding the cause of a problem. We don’t change ten things at once, because then we don’t know what actually solved or caused the problem.
When a circuit doesn’t work, we follow this order:
- Switch off the power.
- Compare the circuit with the schematic or a tested example.
- Check the power source, batteries, USB cable and switch.
- Check plus, minus and the common ground.
- Check the polarity of the LED, diode, battery or other polarised component.
- Check that the LED has a suitable resistor.
- Check that the wires are in the right rows of the breadboard.
- Check that plus isn’t accidentally connected straight to minus.
- If you are using an Arduino, check that the right port is selected, the right program is uploaded and the pins in the code match the circuit.
- If you are using a motor or servo, check that the power supply is strong enough and that the driver circuit is connected correctly.
- Switch the power on only after checking.
- If the problem remains, call the leader and describe what you have already checked.
For more advanced tasks we use a multimeter. A multimeter isn’t only for measuring – it is for asking the circuit questions:
- Is there voltage at this point?
- Is a wire broken?
- Is the battery flat?
- Does the component have the expected resistance?
- Is there a short circuit between plus and minus?
When do we stop work immediately?
We stop straight away, take our hands away from the circuit and call the leader if:
- a battery, wire, motor, LED, resistor, the Arduino, a driver or another part gets hot,
- we notice a strange smell, see smoke or a change of colour,
- a battery is leaking, swollen or looks damaged,
- the USB cable, breadboard or a wire is cracked or damaged,
- a motor jams, vibrates strangely or pulls on a cable,
- the Arduino keeps resetting unusually often after a component is connected,
- water or a drink gets near the circuit,
- a component falls, cracks or can’t be found safely,
- we don’t know where something should be connected,
- someone gets hurt or puts a component in their mouth.
We don’t try to see if it works if we switch it on just once more. First we cut the power, then we look for the cause.
Tidying up is part of the project
A project isn’t finished when the LED lights up, the Arduino prints a result or you score points in the game you built as your project. A project is finished when it has been safely switched off and the next team can start their work in a tidy space.
At the end of every workshop:
- Switch off the battery holder or the power supply.
- Disconnect the USB cable when the leader asks you to.
- Check that no part is hot.
- Write down what the project did, what didn’t work and what needs fixing next time.
- Save the programs you wrote, so that you can use them next time.
- Take a photo of the prototype if that is part of the task and the leader says it’s time.
- Take the circuit apart only if that is planned.
- Put all the components back in their labelled boxes.
- Find any parts that have fallen on the floor.
- Clear the table of paper, bits of wire and leftover materials.
- Tell the leader if something is damaged, used up or missing.
 A little quiz to finish
1. What is the first rule before moving a wire or a component?
2. What is a short circuit?
3. Why does an LED need a resistor?
4. What do you do if a battery, wire, motor or another component starts to get hot?
5. Can we connect an Arduino, a relay or another project to a household socket or 230 V mains voltage in the workshop?
6. Why can't we simply use an Arduino pin to power a motor, servo, relay or electromagnet?
7. What should we check before switching on a breadboard circuit for the first time?
8. What does it mean that an LED has polarity?
9. What is debugging?
10. What do you do if you don't know where to connect a wire or a component?
11. Can there be water, juice, an open bottle or food on the table next to the breadboard and the Arduino?
12. How do we handle batteries correctly?
13. What do you do if you find a small round button battery?
14. Why is it important to keep the workbench tidy?
15. What do we do before changing a mechanical part of the pinball machine, a motor or a servo motor?
16. What are the three required steps at the end of the workshop?